Note: We presume that you have some basic network knowledge, that you do know how to change local IP addresses, and that the network adapter of your computer has already been configured as described in Configure Network Adapter.
The default setup instructions presumes that the Video Lab contains Axis IP cameras and audio devices.
Alternative sources are listedSupported Devices and Protocols in the section Supported Devices and Protocols.
▪Connect the cameras and other Axis network devices to the Mangold-network-switch and make sure the switch is NOT part of the regular local area network (other Network traffic may interfere with the stability of your recordings).
▪Make sure the Mangold-network-switch is attached to the VideoSyncPro computer.
IMPORTANT: To prevent interference from your LAN: Unplug the network cable that connects the computer to the local network of your organization, or disable your WiFi connection.
Initial Axis Device Search
▪Navigate to..\Program Files (x86)\Mangold VideoSyncPro Studio\Utilities).
▪Right-click the Axis software called IPUtility.exe and pick Start as Administrator... from the context menu.
IMPORTANT: If the IPUtility.exe does not show any cameras, although all connections are in place and activated, run the utility using the right-click Run as administrator command.
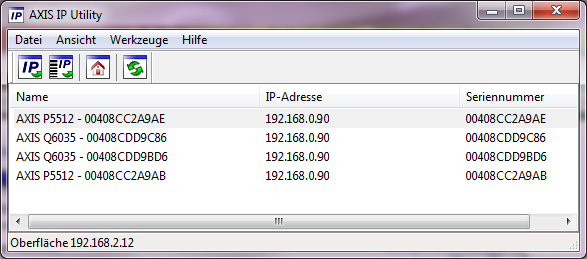
This results in a list of all cameras found, all showing their current (identical) IP Number:

DHCP is the default network-setting for all cameras. If the cameras cannot find a DHCP server on startup, all cameras are accessible via the IP number 192.168.0.90.
Note: If the cameras already display different IP numbers, then they are already preconfigured and you can usually continue with the integration in VideoSyncPro Studio.
•Double click on the first camera or open your Browser and type in the listed IP number.
Because all devices do have the same IP number, you DO NOT know which device will answer first!
IMPORTANT: Do NOT use the IP assign command available in this utility.
Instead, double-click on a line and wait for the browser to open.
Your web browser opens to access one of the listed devices, opening the GUI of its internal web server.
Note: The layout and commands depend on the device type and its firmware and may vary a lot.
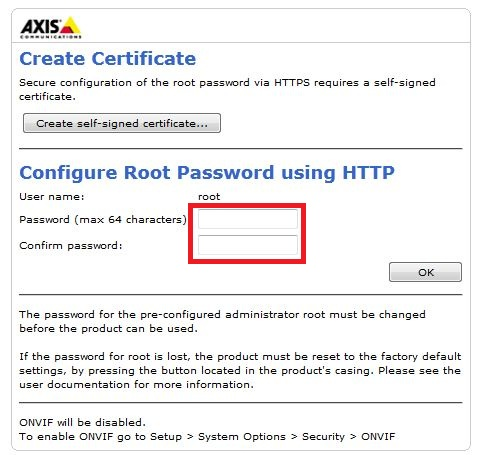
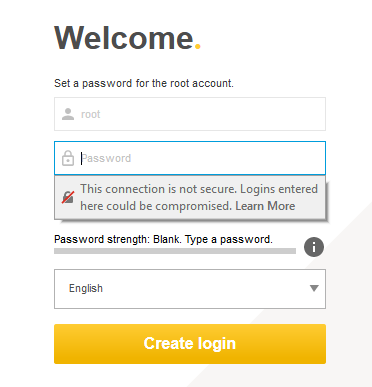
For initial setup, you need to create a password for the root user:


▪Enter "Mangold" as your password.
▪For firmware 7x, select your preferred language.
▪Confirm with OK or with Create login
IMPORTANT: Do NOT enter another password, unless you know exactly what you are doing*.
The default communication of the VideoSyncPro recording station is blocked if accessing the camera requires another password.
Speaker Configuration
▪Read the Connect IP-speaker topic.
Camera Configuration
Once the initial password is setup, this dialog appears, enabling us to log in to the device:

▪Enter 'root' for the user and 'Mangold' as its password.
During the initial setup, cameras with firmware 7.x or up, a wizard guides you through the user settings.
IMPORTANT: Select the correct power line frequency. Power line frequency influences image stability and should match the configuration of the camera.
Once the cameras default setup is done, there are some important settings that must be set before you use the devices with our software.
Because the GUI changes with every firmware update, we skip the screenshots. Even the menu names might need some interpretation, but the required features are available throughout all firmwares.
Below a list of all required settings.
Network Address
Always use a fix IP addresses for all devices in your Mangold network.
▪To verify a preconfigured, navigate to System > Network.
▪Enter a fix and unique IP-number for each camera, to ensure that each camera can be identified by its number.
▪Disable any DHCP or Assign IPv4 automatically options.
Time Server
Crucial for synchronized recordings:
▪Navigate to System > Date & Time or Time and locations.
▪Under Synchronization, select Automatic date and time (manual NTP servers).
▪Enter the IP number of your VideoSyncPro recording station into the manual NTP-servers field.
▪Make sure the Windows Time Server is activated correctly on the recording station.
▪Verify if the the camera is able to synchronize its time with the computer.
(This may take a couple of minutes)
Zipstream
Crucial for synchronized recordings:
▪Navigate to Video > Stream> Zipstream and select OFF from the strength drop-down menu.
Resolution, Frame Rate, and Audio
To prevent unnecessary large videos, and network-traffic overload, reduce the resolution:
▪In most cases it is sufficient to select the Full HD resolution 1920x1080.
Note: Increasing the resolution requires higher network, GPU, CPU, and disc resources.
To ensure that all recordings use the same frame rate:
▪Navigate to Video > Stream> General and set the Frame rate** to 25.
▪Set the P-frames to 49 to create a full image every 2 seconds to improve controllability.
*) It is possible to use another password, but that requires and adaption of the sources in VideoSyncPro Studio.
**) In the US, the default frame rate is 29.97, due to the NTSC TV-standard. For accurate control, this value is mathematical problematic.
At 25 fps, each frames lasts for 40 milliseconds, which is a straightforward number that is easy to calculate with.
To include audio:
▪Navigate to Video > Stream> Audio and activate the Include option.
Custom Configuration
Additional options and settings may be important for your setup, to compensate light conditions or other specific needs.
Firmware Updates
DO NOT UPDATE to the latest Axis Firmware without contacting us!
Note: Latest Firmware updates may introduce issues that influence the synchronized recordings.
▪Repeat those steps for each camera until all cameras are setup correctly and each device has a different IP number.
IMPORTANT: You may need to wait up to two minutes before you can open the next camera within the IPUtility software.
Note: When using non-Axis devices, it is still important to find the locations for setting fixed IP-numbers, timeserver details, resolution and fixed frame rate for each camera.