VideoSyncPro supports Dante audio devices by using a Dante Virutal Soundcard (DVS).
NIMPORTANT: Starting from VideoSyncPro studio 4.15.0 it is possible to use the ASIO interface, allowing for the simultaneous recording of up to 32 channels per recording station.
Older versions need to use its WDM Audio Interface to record up tot 16 separate Dante audio
Dante Controller
The Dante Controller software is required to assign sender sources to receiving sources. The software will automatically find all available Dante devices on the network. The Dante controller is only required on a single computer because it assigns sources across multiple devices.
Assigning the different sources to its receiver is done in an easy to read matrix.
•Install or start the Dante Controller Software.
•Select the camera network adapter as its primary network interface.
The second interface is optional and depends on the local network structure.
Per default, we don't use it.
An empty Matrix appears. On the left of the matrix at least the curent DVS should be listed, using the networkname of the corresponding VideoSyncPro workstation.
•On the top, the available sender sources (typically microphones) are listed.
•Connect each sender to a receiver by clicking into the crossing cell for that line and column.
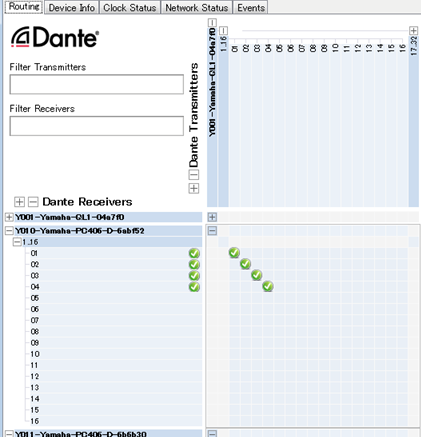
The channel number listed for each VideoSyncPro Studio computer are relevant for the source definition in VideoSyncPro Studio.
Dante Virtual Soundcard (DVS)
Dante Virtual Soundcard is software that turns your computer into a Dante-enabled device, transmitting and receiving high-quality audio over your existing wired network connection.
•Install or open Dante Virtual Soundcard.
•Depending on your VideoSyncPro Studio version, select the appropriate Audio Interface from the drop-down list:
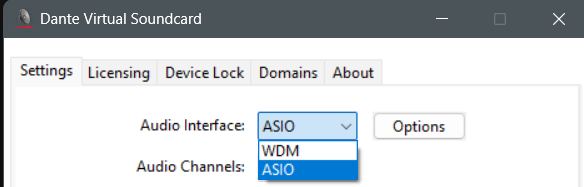
Note: The ASIO Interface performs much better than the WDM interface.
•Open the ASIO properties:
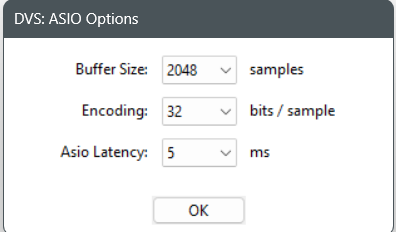
•Set the Buffer size to 2048 (When using the full 32 channels)
•The Encoding value must match the aduio encoding of other sources, like audio inside the video sources.
•Asio latency my vary, depending on the number of sources and available computer resources.
•Confirm your setting with OK.
•Set the Audio-Channels to 32x32.
•Set the Dante latency to 4 ms.
•Select the camera network adapter from the Network Interface list.
•Click Start to activate the virtual sound card.
Define Audio Source
Once all Dante devices are assigned to their respective receivers, the corresponding sources can be configured in VideoSyncPro Studio:
▪Select the command Edit common sources, from the Menu available in the upper right corner ![]() .
.
▪Click ![]() Add Source to manually add a new source.
Add Source to manually add a new source.
▪Select Windows Audio Device from the appearing Select source type dialog:
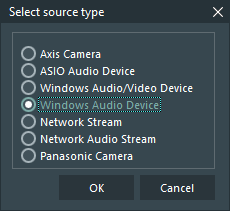
▪Confirm your selection with OK.
At the bottom of your Available Audio / Video Sources list a new empty source entry appears.
▪Enter a name for this source, e.g. 'Mic 1'.
▪Select a DVS audio device listed in the Audio device drop-down list.
Note: The 16 channels are listed as combined devices (channel 1+2, 3+4, etc)
▪Select the Target format in which the separate audio file should be stored.
Use the Target Channel drop down-menu to select the correct channel:
▪Select Left only to assign an uneven channel number (1, 3, 5, etc)
▪Select Right only to assign an even channel number (2, 4, 6, etc.)
▪Click Add to scenario to insert this source into your current scenario.