If you want to use the Auto Fill data routine, you need to define the required Codes first:
▪Click Insert - Autofill - Edit Codes ![]() , to open the 'Auto fill data' dialog.
, to open the 'Auto fill data' dialog.
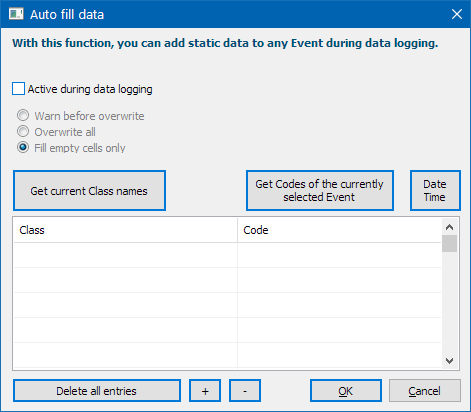
This dialog shows any previous data, if available.
▪To remove all entries, click Delete all entries at the bottom of the dialog.
▪To create a new Class for your static information, click the + button at the bottom.
▪Enter a new Class name manually, if it is not yet available.
▪To get the Class names available in the current document, click Get current Class names.
▪Enter the Codes you want to enter automatically for each Event, into the corresponding Class(es).
▪Confirm your changes by clicking OK.
Use existing Codes
If an Event exists in your data-file, that contains the data you want to use in this Auto Fill function, INTERACT can enter this data into the Auto Fill dialog automatically:
▪Select the Event containing the Code information to be used.
▪Click Insert - Autofill - Edit Codes ![]() , to open the 'Auto fill data' dialog.
, to open the 'Auto fill data' dialog.
▪Click Get Codes of currently selected Event, to copy those Codes to this dialog.
▪Check if the Code information correct and change whatever is necessary.
▪Click OK to confirm your settings.
Add Creation Date and Time
It is possible to define a special kind of auto fill data, that enters the current system date and time into each Event that is logged:
▪Click into the Code column.
▪Click Date Time button:
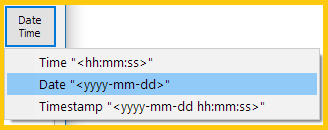
▪Select the time format you want to collect.
You may pick multiple types, to split your information over multiple columns. Once clicked, the following entires appear:

▪Click OK to confirm your settings.
From now on, for every Code logged (into a new Event or while refining existing Events) a time stamp reflecting the current system date and time is entered into this column.
| TIP: | Enter a '?' in-front of the Class name to make it an Invisible Class. This hides the content of those Classes within the data-file. |