Within this example, we use the Coding panel for logging the Codes. If you want to use the shortcut [keys] instead, feel free to do so.
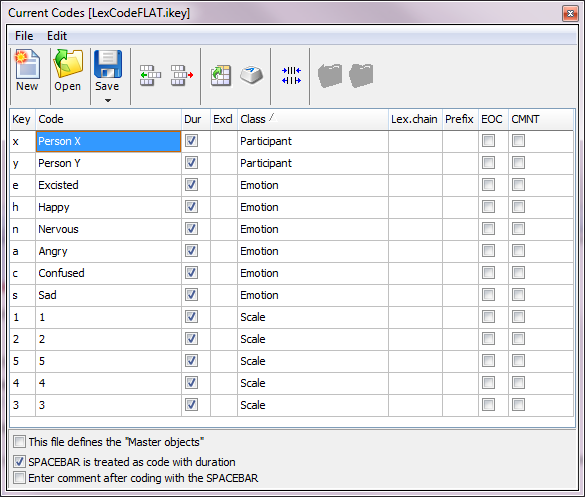
Basic example setup: Imagine, you are observing a social interaction of three people. You want to log the duration someone is talking and the emotional state of this person. A choice of possible emotions is: [s]ad, [h]appy, [e]xited, [n]ervous and [a]ngry. The intensity of the emotion also needs to be logged, based on a scale 1 to 5. Your observational codes are collected in three Classes: 'Object', 'Emotion' and 'Scale'.
▪Open your multimedia file(s) using Start - File - Open ![]() or drag the multimedia file into your document.
or drag the multimedia file into your document.
(You can also activate Live observation in Start - Observation - Observation settings ![]() instead)
instead)
▪Make sure, the Coding modeLexical (post-hoc) is selected.
▪Click Start - Observation - Define Codes ![]() to define the required Codes as displayed or open a previously saved code definition file instead.
to define the required Codes as displayed or open a previously saved code definition file instead.
The Code definition file, for this example, looks like this:
Logging Events step by step
Using the lexical coding mode, as intended, you first log an Event by logging the Start and the End time of that Event. The Observation Codes, describing the occurrences in that Event, are entered afterwards. You can create Events either with the SPACEBAR, the command Start new event in the Coding panel, or directly with a behavioral Code.
▪Click ![]() to activate the Observation mode.
to activate the Observation mode.
If no data file is open, a new data file is created automatically.
A dialog appears if you have already opened one or more multimedia files (the moment a new data file is created). It tells you that you should save your document so that INTERACT can insert the best reference to your Multimedia file(s):
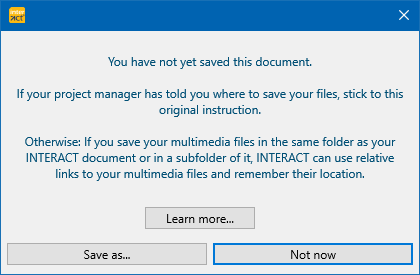
| Cancel: Your multimedia files are automatically linked to the current data set using an absolute reference. |
| Save as...: Recommended! A regular Save as.. dialog appears, asking you where you plan to save your data. |
Depending on where you save your document, INTERACT enters the appropriate link.
Project folder
We recommend to store all INTERACT documents together in the top-level of a "Study" or "Project" folder.
How to structure your videos within that folder depends on the number of recordings per session: For one video per session, a single Videos folder containing all videos will do.
For multiple videos per session we recommend a separate video folder per session, like this:
Windows |
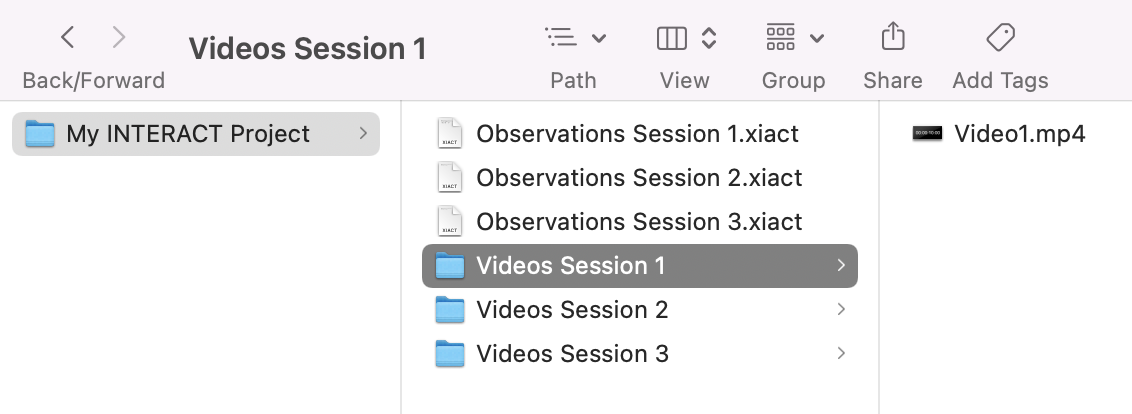
macOS |
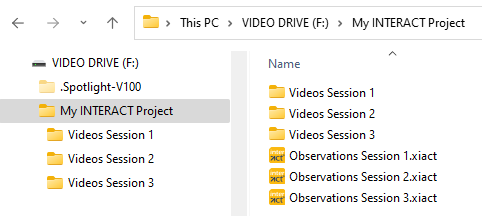
This allows you to insert drive letter independent references to your videos, but are still able to keep the videos separated per session:
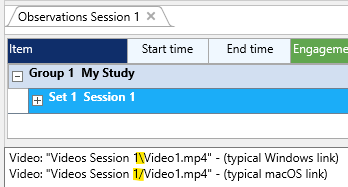
These type of links work for both Windows and macOS because, depending on the current operating system, INTERACT automatically 'translates' the / or \ slashes internally to make the links work. Thus, you may exchange the same drive among operating systems.
Note: This test situation, showing the two different type of links, should open the same video twice.
If you do not have writing access to video storage drive, an absolute reference to that drive is required.
Depending on where you save your current document, INTERACT enters the link in a different way:
1.If you saved the file into the same folder as your multimedia file(s), only the name of the multimedia file(s) is entered, like this:
Video: "Video1.mp4"
2.If you saved your data file in a location 'above' the currently opened multimedia file(s), like in the top-level of a project folder, as explained above, a relative path is entered.
Such a path includes the folder(s) containing the opened multimedia file(s), starting from the data file location, like this:
Video: "Videos Session 1\Video1.mp4"
3.If you saved your data on another drive or in a completely different folder branch, the full, absolute file reference (including the whole path and drive letter) is entered, like this:
Video: "F:\My INTERACT Project\Videos Session 1\Video1.mp4"
When using a relative reference, the file reference stays valid, for as long as the *.xiact file and linked multimedia file(s) are stored within the same folder or folder path.
Note: The moment you manipulate something in the time information, this information is also stored at the end of the multimedia file reference, like this:
Video: "MangoldSolutions.avi", OffsetMs:2500
The Coding panel appears, listing all available Codes and with the command Start new event at the top.
Log Event
To log the start time of a new Event (e.g. as soon as one of the subjects starts talking):
▪Press the SPACEBAR or click Start new Event at the top of the Coding panel.

The video automatically starts playing and a new Event line appears in your data file, showing the start time in blue with a [~] behind it.
The Coding panel now offers the command Stop current Event, like this:

To log the end of the current behavior:
▪Click on the Stop current event button to log the end of the current behavior (or press the SPACEBAR again).
Enter Codes
As soon as the end of a behavior is selected, the video pauses. Additionally, a new symbol appears behind the Timer:

As long as the video pauses, you can enter the required Codes to describe the Event just logged.
▪Click the appropriate Codes, or use the assigned [keys], to describe what happened.
| TIP: | Press F12 to replay the Event as often as required for better judgment of the occurrences. |
IMPORTANT: As long as this Lexical chain indicator ![]() is visible, the lexical-chain mode is active. This means that the current Event is kept active, enabling you to enter multiple Observation Codes into the same line.
is visible, the lexical-chain mode is active. This means that the current Event is kept active, enabling you to enter multiple Observation Codes into the same line.
For our example we continue as follows:
▪Click on 'Person Y' to enter the fact that "Person Y" was talking (or press [y]).
▪Click on 'Nervous' to enter the fact that the person was nervous (or press [n]).
▪Click on '2' to specify the scale of the emotional state (or press [2]).
Your current Event now looks like this:

Note: If you do not remember accurately, what happened during the Event, you can replay the situationwithout leaving the Lexical-coding mode: Press F12 or click on the Play current icon ![]() in the Observation Controls. This way you can watch the situation again and again, to complete your codings accurately.
in the Observation Controls. This way you can watch the situation again and again, to complete your codings accurately.
Continue logging seamlessly
We continue our coding session, presuming that the next person starts talking right away:
▪To start the logging of the next Event, click on the Start new event button again (or press the SPACEBAR again).
The video starts playing, the Coding panel changes again, showing only the Stop current event command. A new Event line with time information occurs in your document and the Lexical chain indicator ![]() disappears.
disappears.
▪As soon as this second person stops talking, click Stop current event (or press the SPACEBAR again).
The video again pauses, the end time of the Event is entered in the second Event and the Lexical chain indicator ![]() re-appears.
re-appears.
▪Click on 'Person X' to record the fact that "Person X" was talking (or press the [x])
▪Click the Codes describing this persons state of emotion (e.g. 'Angry' and '3' for his anger level).
▪Continue like described above, always first logging the start and the end of an Event and entering Codes when the video pauses.
Note: INTERACT needs to be 'told' whenever you have finished coding the current Event. This is done either automatically by clicking the command Start new Event or by pressing the SPACEBAR or by manually disabling the 'Lexical-coding' mode. This is done by pressing ESC or by clicking on the Lexical chain indicator ![]() in the Observation Controls.
in the Observation Controls.
Read Allow gaps in coding for further details.
| TIP: | To log overlapping Events in one pass, read Create overlapping Events for further details. |
Time code corrections
If you discover, that either start or end time are not accurate enough, you can correct them without leaving the Observation Modus:
•To enter the current time value as the start time of the selected Event, press CTRL+1.
•Enter the current time value as the offset of the selected Event, by pressing CTRL+2.
You can, of course, also use the Drag & Drop method.
Note: It is also possible, to start and end each Event with the correct code instead of the SPACEBAR. You can choose what suits you best, even a combination of the two is possible, although this often results in confusion.
AT ALL TIMES, it is important that you use the same [key] to start and end a specific Event. It is not possible to start an Event with the SPACEBAR, and close it with the correct code.
▪To exit the Observation Mode, click the ![]() button in the Observation Controls.
button in the Observation Controls.
Advantages of this coding mode:
•You have enough time to decide which Codes need to be applied on the current Event.
•You can overwrite the contents as often as you need, thus enabling you to correct coding errors right away. (E.g. if you have accidentally clicked '3' as the scale value, but you mend to enter a "2". Simply click '2' to overwrite the already existing code "3".)
•Your Events are 100% seamless*, if you keep to the coding rhythm indicated by the Coding panel (or by pressing "SPACEBAR - SPACEBAR - Code x - y - z... - SPACEBAR - SPACEBAR - Code x - y - z..." etc.) throughout the video, without winding the video back or forth manually or making any other entries in the Document.
This enables you to code your video fast and extensive at the same time.
*) If an absolute error free sequential coding is what you need and/or the overlapping of Codes should be ruled out, you should read the section Coding Consistently & Sequentially.
Disadvantages of this coding mode:
Because the duration for all Codes within a single Event is identical, the length of each Event is determent by the Code that changes first.
Depending on the structure and nature of your coding system, this might result in having to enter the same information again and again, because a only tiny item changes. In these cases, it might be a good idea to rethink the structure of the system to simplify the coding process, but with the need to run the Pattern Segmentation routine on your data once you have finished coding.
That way, an alternative approach might be to log single Events per 'Level' each with their actual length, instead of the chopped Events due to underneath changes. Ask for help if you feel coding life becomes to awkward or tedious.
| TIP: | Take a look at the detailed example described in the section Collect Nested Observations with Different Duration, in which data is logged with the intention of using this segmentation command right from the start. |