In this approach, we want to log the times the moment one or more subjects move from one area to another.
To collect this information in a useful way, we need at least 5 Class columns (one for each area in this case). The 'Codes' we need to enter our observations, are just the numbers 0 to 9. Those Codes are the same for each Class. To be able to re-use those numbers for each area, we need two Code definition files:
oA top-level containing all areas
oA second level file containing all numbers
Per default, this would result in 2 Classes: One for the areas and one for the numbers. Due to how INTERACT handles this information, it is better to split the information into separate columns per area, at least in this case. This can easily be done using the 'Prefix' column:
Define Codes
We start with what becomes the second level file of our coding system:
▪Create a Code definition file with the numbers 0...9:

Because we need values larger than nine for our counting session, we need to enter multiple numbers into one Event. That is why we cannot select the EOC (End Of Chain) option for our number 'Codes.
The additional DONE Code at the bottom is not logged (no Class entered), but due to the selected EOC option, it can be used to close the coding for the current Event and switch back to the area Codes, during an observational session.
To make this work, we need a second file, that becomes the top-level file of our coding system:
▪Create a second Code definition file containing all areas:
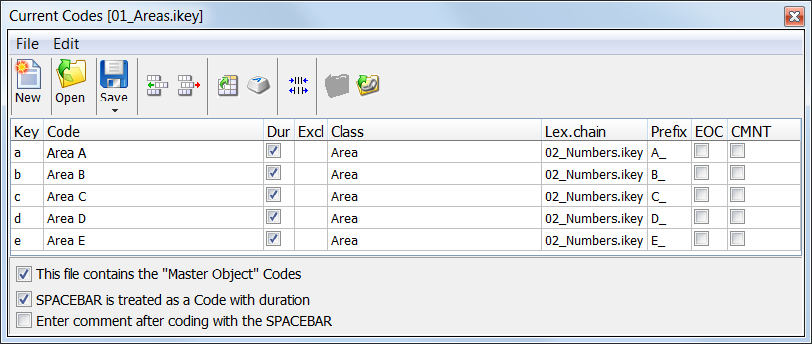
To make the two files interact the way we need:
▪Enter the name of your numbers file into the Lex.Chain column.
To automatically create separate columns for each area:
▪Enter a unique Prefix to identify each area. This entry is used in combination with the next level Class description.
The information in the Prefix column is added in front of the Class information of the subordinated Codes! This way you create context based Class descriptions.
In our case, this results in Classes named 'A_Num', 'B_Num', 'C_Num', etc.
Each Class column, is created the moment you log the first Event for an area.
Log Events
For this example, we use the coding mode Complex, during a live observation. Because we need to enter numbers larger than 9, we need to activate the coding option Combine codes as well.
▪Ensure that the top level file 01_Areas.ikey, is opened in Start - Observation - Define Codes ![]() dialog.
dialog.
▪Select the Master objects option at the bottom of the dialog.
▪Click Start - Observation - Observation settings ![]() to set your preferred Observation settings.
to set your preferred Observation settings.
▪Select as your Observation source: Live Observation, to activate the live observation mode.
▪Select the Coding mode:Complex.
▪Select the Coding option: Combine codes from the same class.
▪Confirm with OK.
If you are ready to start your observations:
▪Click ![]() , to activate the observation mode.
, to activate the observation mode.
Note: If you do not see the current time, displayed as an ongoing time code, you did not activate Live observation as you observational source in the Observation settings dialog.
▪Count the objects in area A.
▪Press [a] to identify the Area (or click on 'Area A' in the Coding panel).
A new Event with time information is created and the Code 'Area A' is entered into the column 'Area'. The second level Code file, containing the numbers, automatically appears. Presume you have counted 24 objects.
▪Press [2] [4] to enter the value '24'.
A new Class column called 'A_count' is created automatically, containing the value "24". This Event is left 'open', until the number of objects changes. This way, we also log the duration for each number of subjects per area.
▪Press ESC to return to the first Codes file, or click the 'DONE' Code.
▪Count the next area (e.g. Area B)
▪Press [b]
Again a new Event appears, with the current time as start time and the Code 'Area_B' in the Class column 'Area'. The number Codes are now available again. Presume you have counted 15 objects:
▪Press [1] [5]
A new Class column called 'B_count' appears, containing the value '15'.
▪Press ESC again to return to the Master objects, or click 'DONE'.
▪Repeat the last 4 steps for each area.
After some entries, your INTERACT document looks something like this:
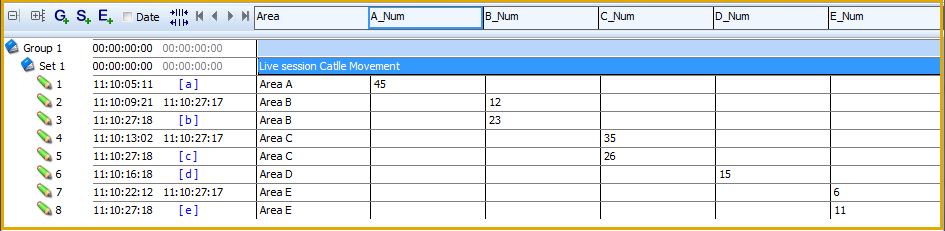
As you can see, each Area has its own Class column containing the values of your counts.
As soon as the number of objects within an area changes:
▪Choose the corresponding area and enter the new value.
The previous Event, for that area, is automatically closed and a new Event, containing the new value, is logged.
| TIP: | To evaluate data like this, look at the interesting ideas in the topic Compare Events in the INTERACT Examples file |