This approach requires a full count for each area every so many minutes, neglecting any individual changes in-between. We count the number of subjects, per area, every 5 minutes and log a new Event every 5 Minutes to store this information.
This process requires a slightly different setup, although we use basically the same Code definition files. The few changes we are going to make, do have a huge impact on how your data is logged, though!
Define Codes
Because we want to enter all results per Area into the same Event line, we need to be able to log the numbers for each area, without leaving that Event. This can only be done by building a loop, using a circle reference:
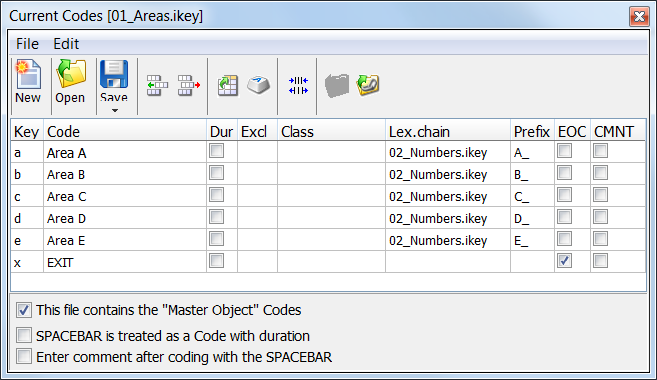
In addition to the area names, there is now an 'EXIT' Code to break the loop.
To log our Events without duration:
▪Disable the SPACEBAR is treated as a code with duration option, as well as the Dur checkbox for all Codes.
The Class name 'Area' has been removed, because now all areas are logged into the same Event, and this causes the next area to automatically to overwrite the previous entry. If you find it helpful to see what area you are about to enter the count results, feel free to keep the Area class. It has no value in the statistics though.

•The 'DONE' Code on the second level, has changed to '>>NEXT>>'
•The EOC option is cleared.
•The option SPACEBAR is treated as a Code with duration is cleared
•To create the loop, a link - to the top level 01_Areas.ikey - is entered into the Lex.Chain column
Due to this link, an infinite loop between areas and numbers is created. This allows you to enter the count results for each area into the same Event. Selected Dur options for sub level Codes, have no impact at all!
Log Events - Multimedia based
For this example, we use the Coding mode: Lexical (post hoc). We generate Marker-Events every 5 Minutes to do our counting. Because we need to enter numbers larger than 9, we need to activate the coding option Combine codes as well.
▪Click Start - Observation - Observation settings ![]() .
.
▪Select Observation source:Multimedia Coding.
▪Select the Coding mode:Lexical (post-hoc).
▪Clear the option Start new Event with next video image.
▪Select the Coding option: Combine codes.
▪Confirm those settings with OK.
▪To adjust the step width, click Observation Ribbon - Time Control Settings ![]() .
.
▪Set the Step width value to the required interval, here 00:05:00:00
▪Confirm with OK.
▪Ensure that the top level file 01_Areas.ikey, is opened in the Start - Observation - Define Codes ![]() .
.
If you are ready to start your observations:
▪Click ![]() , to activate the observation mode.
, to activate the observation mode.
▪To create the first Event, click Start new Event or press the SPACEBAR (no duration for the SPACEBAR!)
A new Event with time information is created.
▪Count the objects in area A.
▪Press [a] to identify the Area (or click on 'Area A' in the Coding panel).
The second level Code file, containing the numbers, automatically appears. Presume you have counted 24 objects.
▪Press [2] [4] to enter the value '24'.
A new Class column called 'A_count' is created automatically, containing the value '24'.
▪Click '>>>NEXT>>>' or press [y] to continue.
▪Count the next area (e.g. Area B)
▪Press [b]
The number Codes are now available again. Presume you have counted 15 objects:
▪Press [1] [5]
A new Class column called 'B_count' appears, containing the value '15', still within the same Event.
▪Press [y] again to return to the areas, or click '>>>NEXT>>>'.
▪Repeat the last 3 steps for each area.
To proceed the video to the next stop:
▪Click on the multimedia window and press your ARROW RIGHT key (or click into the video slider) to move ahead the 00:05:00:00 (5 minutes), you specified in the step slider.
▪To create the next Event, click Start new Event or press the SPACEBAR.
▪Repeat the steps above to enter the counting results for this point in time.
After some entries your INTERACT document looks something like this:

Log Events - Live Observation
The actual coding is exactly the same as described just before in Log Events - Multimedia based. The only differences are:
▪Activated the Observation source:Live Observation.
▪Skip the part about define Step width, within the Time Control settings.
▪Instead of moving your multimedia file 5 minutes forward, you'll have to wait for 5 minutes, before you can press the SPACEBAR to log the next new Event.