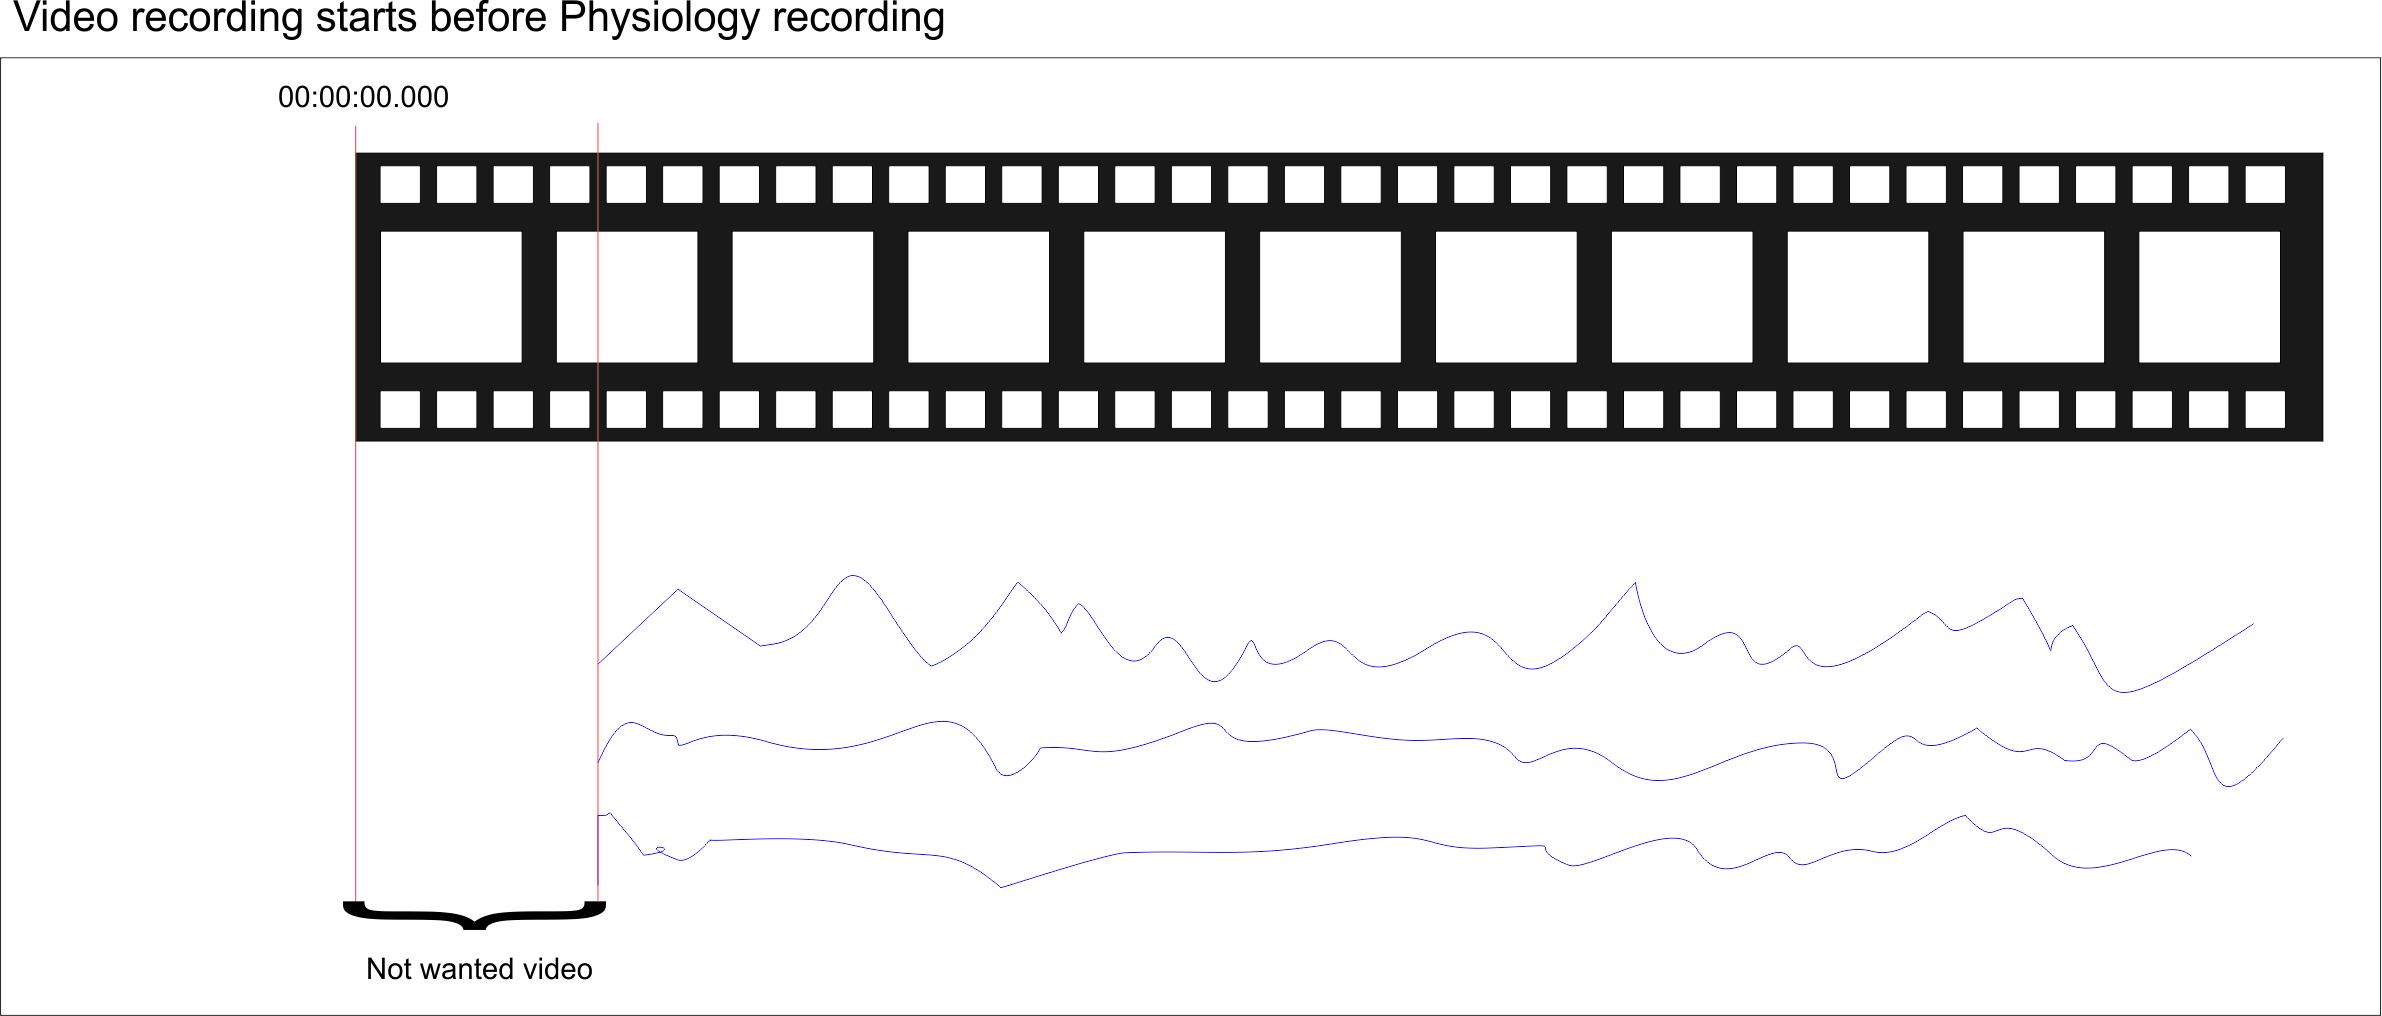
If your video recording started BEFORE your sensor data recording, we have the following situation:

In this situation, it is important that you can clearly see - in the recorded video - the actual push or click that starts the sensor recording or any other visible sign that proclaims the start of the sensor data recording.
▪Open your video(s) in INTERACT.
▪Find the exact video frame in which the sensor data recording started.
▪Memorize the exact time stamp of that frame.
You now have two possible approaches for synchronization:
Adjust the video start time in INTERACT, and import the sensor data with start time zero. The part of the video recorded BEFORE the sensor data started is ignored and will not be accessible for analysis.
Adjust the time value during DataView import, so the first data line, matches the video time where the data recording started. When playing the video from the start, the DataView data will only start moving, the moment the sensor data recording starts.
Adjust the video start time in INTERACT
The INTERACT technique developed for synchronizing multiple videos, can also be used here. It virtually moves the start point of the video to the moment the sensor data recording started. This means that this point is now seen as 00:00:00:00.
This method is perfect for the following situations:
oThe video material that was recorded before the sensor data started, is not needed for analysis.
oYou did not yet start coding your video, based on the original time information.
▪Start DataView.
▪Click File - Open in DataView and select the first sensor data file to start the import wizard.
▪Set the header information and value separator as is described in the Import Sensor Data chapter.
Depending on the content of your sensor data file, pick the scenario that fits your situation:
Note: Even if your sensor-data has time information included, it is usually advisable to ignore that time value and specify the actual sampling rate instead. This only applies to fixed sampling rates of course.
Data without time information
On the 4th page of the import wizard:
▪Make sure the option This file contains time information is NOT selected.
On page 7:
▪Select the correct line distance and format
▪Enter 00:00:00:00, into the video timecode field at the bottom.
Data with time information
On the 4th page of the import wizard:
▪Make sure the option This file contains time information is selected.
On page 8:
▪Select the correct column, in which your time information can be found.
▪Select the First line shall be zero option.
The sensor data now starts in sync with the video, when started from the new virtual point zero.
IMPORTANT: If you have made any time adjustments to your observational sources, within INTERACT, NEVER open those videos manually!
If opened manually, INTERACT does not know about any synchronization information...
To use the information that is stored in the video reference(s), open the corresponding multimedia file(s) like this:
▪Start INTERACT
▪Open the INTERACT document that contains the links and Codes.
▪Double-click on any of the time values listed.
INTERACT now automatically opens the corresponding multimedia file(s), based on the references in the document and therefore 'knows' about any synchronization or time adjustments.
Note: If a file is not opened automatically, something in the path pointing to the file has changed (e.g. the drive letter appointed by Windows has changed).
Only this method activates any previously set time adjustments.
Adjust the time value during DataView import
In this case, the original video length and time information is kept as it is. This means there is no sensor data available for the first part of the video. The sensor data charts will start moving the moment the synchronization point is reached.
▪Remember the video time value displayed in INTERACT, the exact moment the sensor data recording started.
▪Start Mangold DataView.
▪Click File - Open in DataView and select the first sensor data file to start the import wizard.
▪Set the header information and value separator as is described in the Import Sensor Data chapter.
Depending on the content of your sensor data file, pick the scenario that fits your situation:
Data without time information
On the 6th page of the import wizard:
▪Make sure the option This file contains time information is NOT selected.
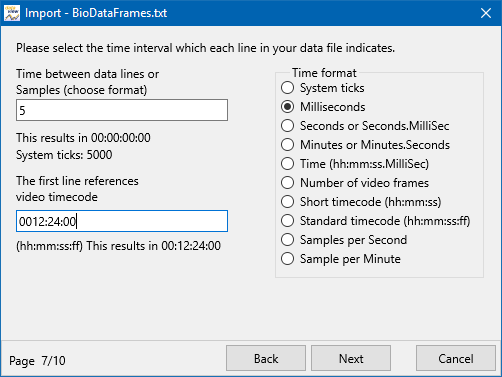
On page 7:
▪Enter the video time code value of sync frame, you wrote down, into the video timecode filed at the bottom:

Data with time information
On the 6th page of the import wizard:
▪Make sure the option This file contains time information is selected.
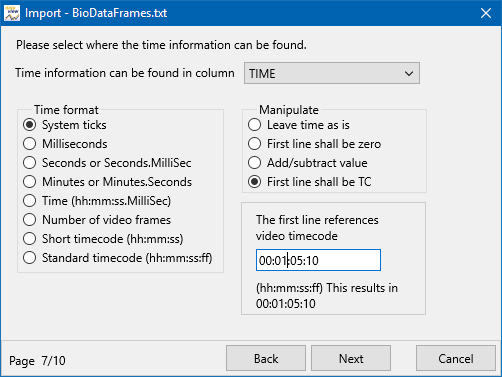
On page 7:
▪Select the correct time column, in which your time information can be found, from the drop-down menu.
▪Select the option First line shall be TC.
▪Enter the video time code value you wrote down into the Time code field:
