IMPORTANT: The Workflow-Editor is only available in Mangold INTERACT Professional edition and up.
Start the Workflow Editor
▪Open the Workflow Editor using the command Start - Advanced - Workflows ![]() > Workflow Editor
> Workflow Editor
Usually, am empty Workflow canvas appears, so you can start right away.
If a previous workflow is visible:
▪Select File - New from the Workflow Editor menu.
All available Modules listed at the left side of the Workflow Editor. The list contains different sections to logically group the available commands by type.
Add Command Modules
A Workflow consists of one or more modules. Each module is a functional unit that carries out a specific task.
Note: Because a routine is usually applied to the current data file and the outcome should be entered either into the original document or into a new file, most routines start with the Document source module and end with a Destination source module.
An import routine using a Python script might hold only a single Python Interpreter module.
Each command or task is represented by a module or object. Adding a specific command to your template is easy:
▪Find the Module you need in the module list on the left side of the Workflow Editor.
(if you know the name of the object, type the first few characters in the search field)
▪Double-click the module you want to use.
OR
▪Drag a module from the list to a specific position in the graph.
Usually, the first module you need is Source Document, to specify on what data the further routines should be applied, so that is most likely the first module you need:
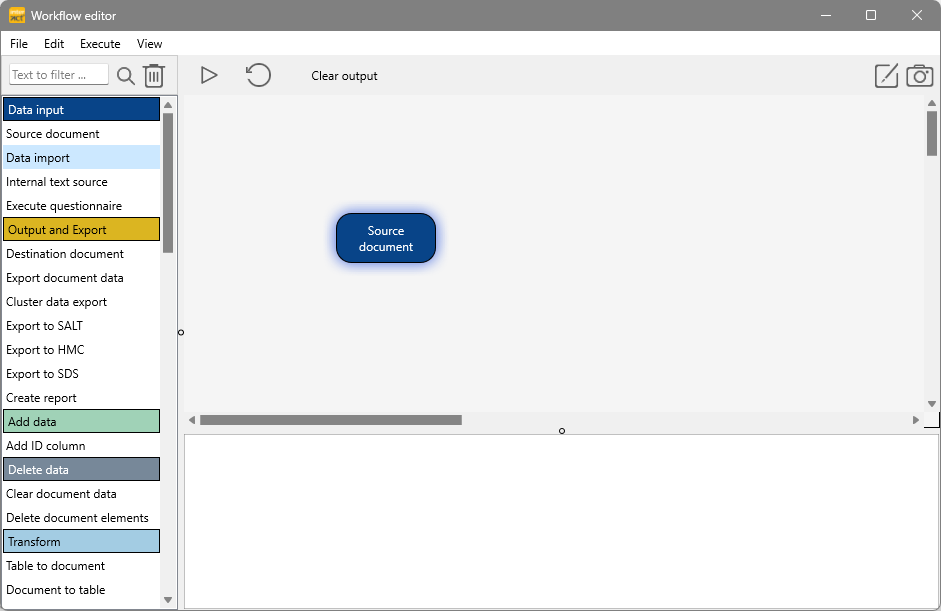
Source Document Module
To adjust the exact functionality of a module, each module has module dependent settings. Even two different types of properties may exist!
We differ between Basic properties and Properties. Each module has Basic Properties that allow you to specify generic settings for the selected module.
Some modules also have Properties that enable you to predefine user defined requirements, like Codes to select, sequences to be found, etc., using project specific requirements.
Source Document - Basic Properties
Each object has some basic properties.
▪Right-click an object and select Basic Properties to open its properties dialog:
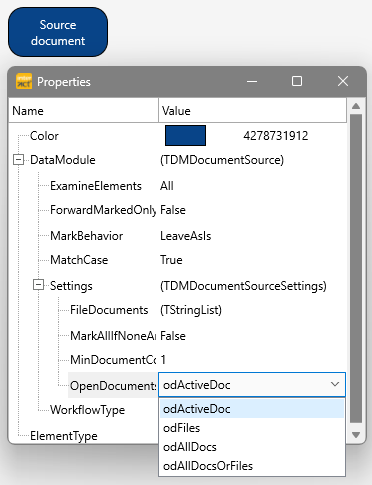
Expand all items to see the full content of the Basic Properties dialog:
oColor |
The color in which the current module is displayed within the Workflow Editor. By default, the different types of operations are assigned to separate colors. |
oItems to examine |
Determines whether all lines are used in the current module or only the selected lines (those with a green dot in front of them): oAll : This module uses all data, existing Events and new lines created by the previous workflow modules. oMarkedOnly : This module uses only the currently selected Events. oNotMarkedOnly : This module uses only the currently NOT selected Events |
oForward marked Only |
Determines whether all lines are forwarded to the next module or only the current selection (those with a green dot in front of them): oFalse : This module forwards all data to the next module. oTrue : This module forwards only currently selected Events to the next module. If no Events are selected, all Events are used. |
oMarking behavior |
Determines how the line selection should be handled during the routine: oLeaveAsIs : This module does not change the current selection of Events. oUnmarkAll : This module clears any available selection oMarkAll : This module selects all currently available Events oMarkNewOnly : This module clears any previous selections and selects only the data resulting from its own operation. oKeepExistingAndMarkNew : This module keeps the previous selection and adds the data resulting from its own operation to the selection. |
Data Module Settings
oFileDocuments |
Optional string list, allows you to specify one or more specific documents on which the routine should be applied. |
oMinDocumentCount |
Number of open documents required for the routine. Should usually be set to 1, to ensure that at least one data files open. |
oOpenDocuments |
This setting tells the Workflow on what data it should be applied: oodActiveDoc : Current data document - Default value oodFiles : oodAllDocs : All open data documents oodAllDocsOrFiles : |
oElementType |
Name of the current module |
Source Document - Settings
This Module offers no further settings to specify.
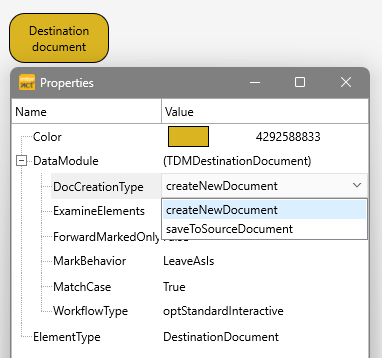
Destination Document Module
Independent of the number of commands in between, to store the results of your actions, you need to specify a destination document.
Destination Settings
IMPORTANT: To see or access the results of your Workflow, your need to specify a destination object!
This means that you need to add either a Destination Document object, a Data table output or one of the other output objects to your Workflow.
A Destination Document is a regular INTERACT *.XIACT data file. You need to specify if the results are entered into a new document or into the original source document:
Link Objects
To create a workflow, it is vital that you link the objects in the correct, logical order:
▪Select the preceding object.
▪Press the CTRL key on your keyboard.
▪Click the succeeding object to create a link between the two objects:

A line with an arrow head pointing in the selected direction now connects the two objects.
Remove an existing link
If you linked two Objects and realized that you linked the wrong objects or in the wrong direction, you can easily remove the link:
▪Select the Object at the start of the link.
▪Press the CTRL key
▪Click the Object at the end of the line (where the arrow head is).