The Prefix column in the Code definition dialog, is a powerful attribute. It allows you to create context based Classes, while logging Events. This means, you can work with a very complex hierarchical Coding system, without having to predefine every single combination up-front.
With the 'Prefix' attribute correctly used, you create Class columns on the fly, whenever they are required. The functionality was initially developed for a so called FACs coding system (facial expression codes), but can be used for any other complex system as well.
IMPORTANT: You need to build a chain of at least two Code definition files in order for the 'Prefix' to take effect, because the prefix is always applied to the next level. This means, you cannot use this in the Standard logging mode.
The idea
The principle of a 'Prefix' in this case, is that you are able to add context based information to the Class of the next level of Codes, during a Coding session. Which additive is applied is controlled by the previous, higher-level Code used.
This means, that the Class name of a sub-level Code, depends on the Code selected in the preceding level.
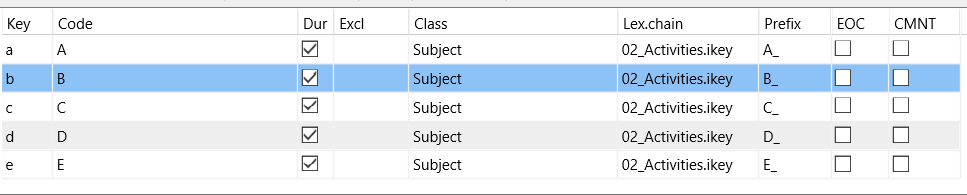
Example: If you want to collect several 'Activity' Codes for, let's say 5 test subjects ('A', 'B', 'C', 'D', 'E'). You want this data (e.g. 'sleeping', 'eating', 'sitting', 'moving') to be entered in a separate column for each Subject: "A_Activity", "B_Activity", "C_Activity", etc.
Without Prefixes, this results in at least 6 linked Code definition files, each of them containing exactly the same Codes, but assigned to another Class. Or you need one large Code definition file, with many, many different Keys for more or less the same Codes.
Note: We presume that you are familiar with the basics of logging Events with INTERACT using either the Coding Mode: Lexical (post-hoc) or the Coding Mode: Complex .
For this example, using Prefixes, we need only 2 Code definition files (even if you have 50 subjects):
▪Create one Code definition file, containing all activities - e.g. Codes with the Class 'Activity':

▪Create another file, containing all subject identifiers; each with a unique entry in the Prefix column (e.g. 'Subject A' with Prefix 'A_', 'Subject B' with Prefix 'B_', etc.):
The Prefix entry ensures that the 'Activity' information is stored in a separate column for each person.
▪Select the option This file contains the "Master Object Codes" at the bottom of the dialog for this top-level file.
▪Link the second-level Activity.ikey file to each of the subjects, using the Lex.Chain column.
During an observational session, this setup results in at least 6 columns called 'Subject', 'A_Activity', 'B_Activity', 'C_Activity' etc.
Explanation: Depending on the subject clicked on the first level (the 'context'), the Class on the second level can be extended with the values/character entered into the Prefix column. This means, that with only two Code definition files, you are able to handle the example above, independent how many subjects you have. In this case, the Prefix for each subject is similar to its name. If you click A, the 'A_' is added in front of the regular 'Activity' Class from the second level Codes.
If you have more subjects, you just need to extend the top-level subjects file and the required columns are created automatically, whenever needed.
▪Read the section Prefix - Create content based Classes, to find various examples - some rather simple, some rather complex, showing you just a glimpse of the possibilities.
Pass on Prefixes
For two level Code definitions, all is clear: the Prefix from level 1 is entered in front of the Class from the second level Code definitions file.
If you have 3 or more levels of Code definitions, but leave the Prefix column on level 2 empty, the prefix from level 1 gets lost! This means, that all lower level Classes are created regularly, without the prefix. In this example the Class 'Scale' is created to store the level of loudness for all 'Talking' Events.
If that is not what you want, you need to pass on the first level Prefix. This is done by entering a '+' into the Prefix column of second level file. In our example, this results in a separate 'Scale' column per subject, like 'A_Scale', 'B_Scale', 'C_Scale', etc. You can repeat this over multiple levels.
Combine Prefixes
Even more imaginative can the naming of classes be designed, when you combine their prefixes! This means you can insert a new Prefix on the second level and add the '+' in front, to create separate 'Scale' columns for each subject.
▪Read the example in FACS - Interval Based for more details.