Note: We presume that you have some basic network knowledge, that you do know how to change local IP addresses, and that the network adapter of your computer has already been configured as described in Configure Network Adapter.
▪Connect the cameras and other Axis network devices to the Mangold-network-switch and make sure the switch is NOT part of the regular local area network (other Network traffic may interfere with the stability of your recordings).
▪Make sure the Mangold-network-switch is attached to the VideoSyncPro computer.
IMPORTANT: To prevent interference from your LAN: Unplug the network cable that connects the computer to the local network of your organization, or disable your WiFi connection.
Initial Axis Device Search
▪Navigate to..\Program Files (x86)\Mangold VideoSyncPro Studio\Utilities).
▪Right-click the Axis software called IPUtility.exe and pick Start as Administrator... from the context menu.
IMPORTANT: If the IPUtility.exe does not show any cameras, although all connections are in place and activated, run the utility using the right-click Run as administrator command.
This results in a list of all cameras found, all showing their current (identical) IP Number:
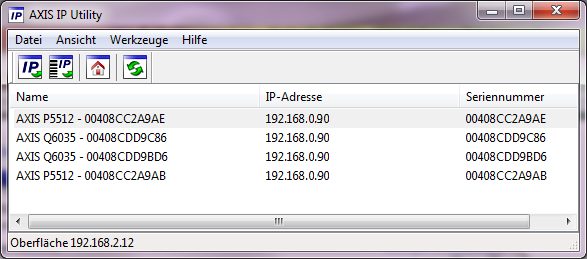
DHCP is the default network-setting for all cameras. If the cameras cannot find a DHCP server on startup, all cameras are accessible via the IP number 192.168.0.90.
Note: If the cameras already display different IP numbers, then they are already preconfigured and you can usually continue with the integration in VideoSyncPro Studio.
•Double click on the first camera.
IMPORTANT: Do NOT use the IP assign command available in this utility.
Instead, double-click on a line and wait for the browser to open.
Because all devices do have the same IP number, you DO NOT know which device will answer first!
Your web browser opens to access the cameras internal web server. The layout and commands depend on the firmware of your camera:
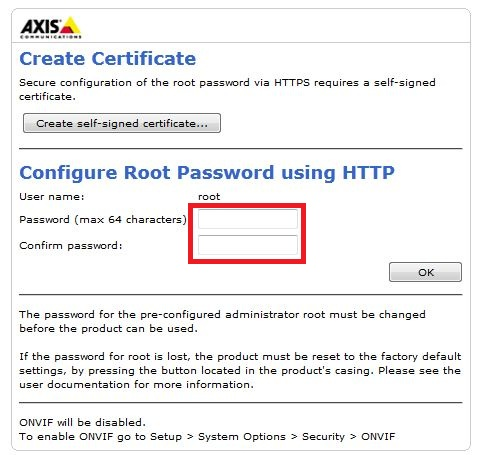
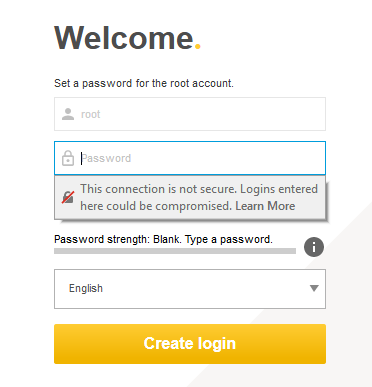
▪Enter "Mangold" as your password.
▪For firmware 7x, select your preferred language.
▪Confirm with OK or with Create login
IMPORTANT: Do NOT enter another password. The communication of the VideoSyncPro recording station is blocked if accessing the camera requires another password.
Whenever you now receive this dialog, you need to enter the 'root' for the user and 'Mangold' as its password:

For cameras with firmware 7.x, a wizard guides you through the user settings. Most defaults are OK in this firmware, the only thing you need to specify, is a unique IP-number per camera.
Initial Setup firmware 5x and 6x
During your initial Setup, or after a reset to factory settings, you need to specify the language and the local power settings before the configuration can start:
▪Language: For firmware 5x and 6x, ALWAYS pick 'Use English' (Third option), alternative Axis language files are usually not accessible.
▪Capture Mode: Available options depend on the Camera Type.
WDR = Wide Dynamic Range. WDR is essential for locations with extreme light differences within the camera range. This brilliant algorithm can handle changing light situations impressively.
WDR does only work for frames rates up to 30 fps.
▪Power line Frequency: Pick the frequency of your region (Europa, … = 50Hz, USA, Taiwan, … = 60 Hz)
▪Confirm each setting.
User settings
After this initial setup, you end-up at the webserver page of the camera:

▪Click on Setup in the upper right corner of this web server dialog.
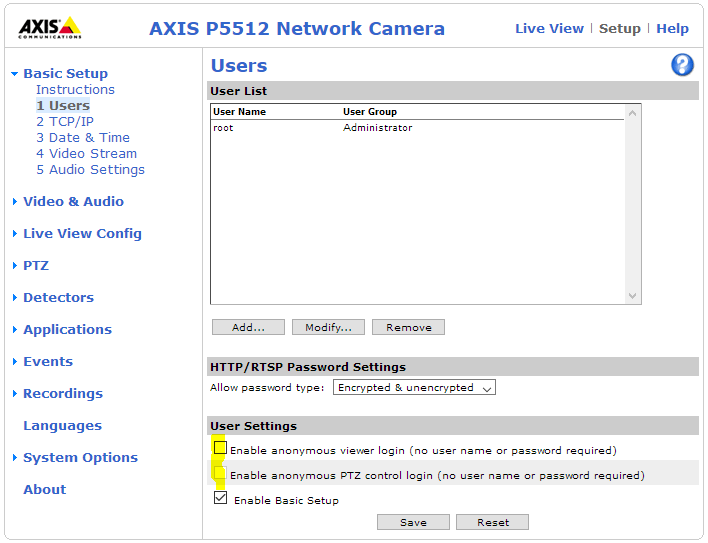
▪Click on 1 Users at the left, to verify all permissions:
▪Clear the first two options under User Settings:
▪If you want others to access the cameras through the network, add additional users.
Note: Additional users are not a part of our Mangold lab setup.
▪Click Save to confirm your changes.
IMPORTANT: Make sure you click save on each of the next windows to keep your changes.
Network Settings
To eliminate the risk of having to find your cameras, again and again, we strongly recommend assigning fixed IP numbers to your cameras.
▪Switch to the TCP/IP topic within the upper left Basics Setup section:
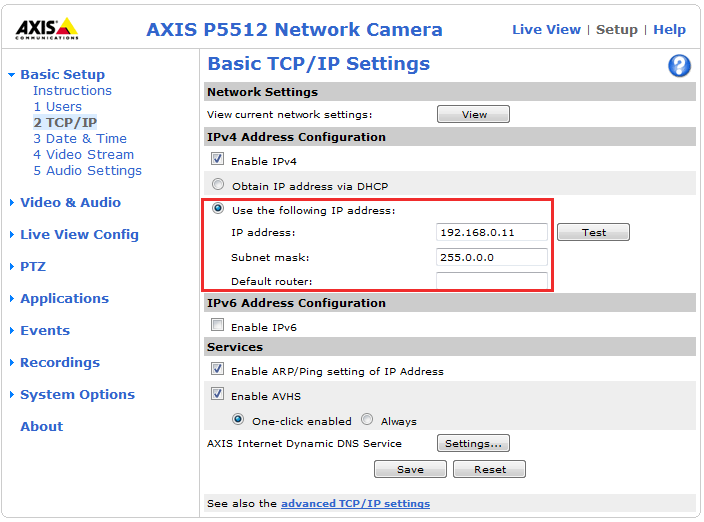
▪Select the Use the following IP address option.
▪Enter a valid IP number.
Note: We suggest to use the following numbers for your cameras:
192.168.0.11, 192.168.0.12, 192.168.0.13, 192.168.0.14 unless you have another network range to fit in.
▪Click Save to confirm your changes.
IMPORTANT: If you have changed the IP address of a camera, you need to reload the camera before you continue. Update the list in the Axis IP utility and double-click the camera with the new IP number.
(You might need to wait for about 60 seconds before the next camera can be selected)
Date &Time
The correct date and time information are also critical.
▪Switch to the Date & Time topic within the upper left Basics Setup section:
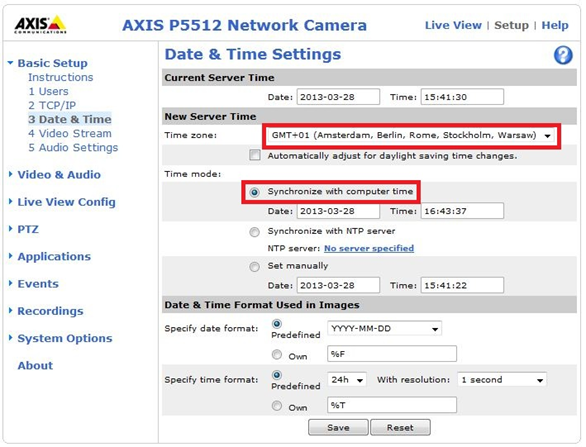
▪Select your current Time zone from the list.
▪Select the option Synchronize with computer time to ensure synced time stamps, or set up a local NTP server on your recording system.
▪Click Save to confirm your changes.
Audio
Per default, audio is disabled in this firmware version, to enable audio:
▪Switch to the Video Stream topic within the upper left Basics Setup section:
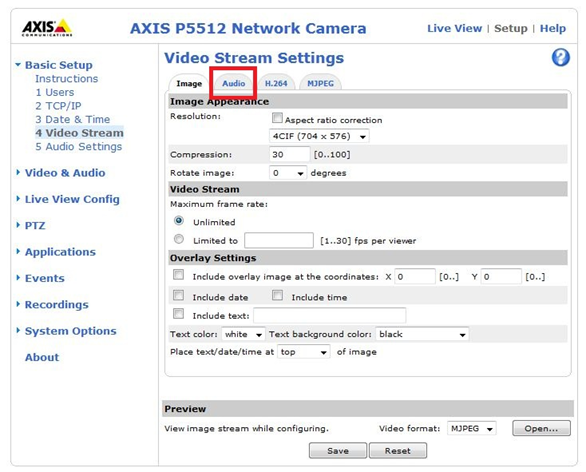
▪Select the tab Audio within the Video Stream Settings dialog:

▪Select the option Enable audio to record the audio source connected to the camera.
▪Click Save to confirm your changes.
▪Repeat those steps for each camera until all cameras have a different IP number.
IMPORTANT: You may need to wait up to two minutes before you can open the next camera within the IPUtility software.