In some situations, shifting the logged time information for all or a range of your Events is necessary.
Instead of changing each time code single handedly, you can tell INTERACT exactly how much all selected time values need to be changed and in what direction (start earlier or later, end earlier or later). The software performs the change for you in the wink of an eye.
Note: If you need to adjust complete DataSets, in order to compare their contents, read Move DataSets Virtually in Time instead.
Change start time, Offset and/or Duration
You can change the start time and the offset individually and thus change the duration of the selected Events as well:
▪Select* all elements, for which the time values shall be corrected identically.
*) Use the CTRL or SHIFT key to select multiple lines.
▪Click Transform - Time Values - Shift ![]() .
.
The following dialog appears:
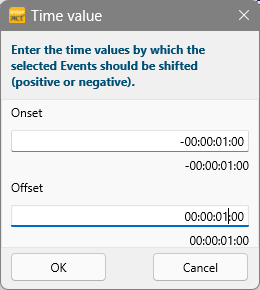
▪To shift the start time of the selected Events 1 second in start direction:
enter -00:00:01:00 into the Entry field.
▪To shift the offset of the selected Events one second in play direction:
enter 00:00:01:00 into the Exit field.
▪Confirm with OK
A second dialog appears, asking you to confirm your settings:
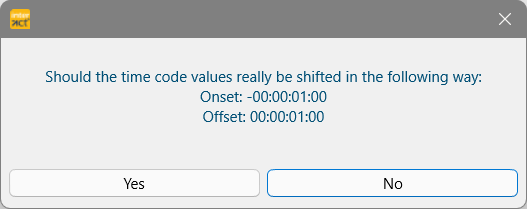
▪Click Yes to confirm to perform the changes.
INTERACT now changes all the start time and offset times for the selected elements accordingly; resulting in an increased duration for each selected Event of two seconds.
IMPORTANT: If you enter the same value, for both start time and offset, the Events are moved as they are. If you enter different values, the original duration is changed.
Because INTERACT can handle dates in combination with time values as well, it is possible to use this Shift Time Values command, to add a date to all selected elements as well:
▪Select all Events to be altered.
▪Click Transform - Time Values - Shift ![]() .
.
▪Enter the date you need into the Start time and End time text boxes like this:
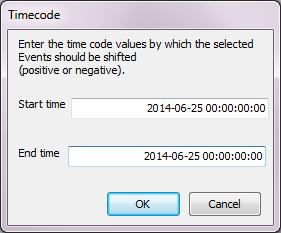
▪Click OK to confirm.
▪Confirm the confirmation dialog as well, to insert the date to all selected Events.
All time information is stored as a 100 Nanosecond value to be as accurate as possible. For videos that are recorded at 25 fps (frames per second) this is fairly easy because one frame = 40 milliseconds. For videos recorded at 29.97 fps, the timing is never that clean (1 frame = 33,3667 milliseconds)
When logging time information INTERACT stores a time value corresponding to an multiplication of a frame duration. Due to latencies caused by the video (codec), using videos with different fps, or other reasons, your file may contain time information that is not perfectly matching the current frames per seconds value of the file.
When displaying your time information in the default Timecode format - showing frames for the last two digits, you cannot see this.
Duration calculation in the statistics is always based on the whole frames you see, so usually, it is not a big deal.
If you make use of routines like the State-Space-Grid or the Pattern Segmentation, the issue might becomes apparent, though.
These routines work with the millisecond information instead of the frames, which means that even if your time information looks perfect to you on Frame-level, there might be tiny gaps and overlaps on the millisecond level.
For gaps, the State-Space-Grid will show a lot of tiny circles in the bottom left corner (or the first column or the bottom row). Dialing the option Show empty codings removes these 'errors'.
When using the Create coding patterns command, tiny overlaps will result in many very small Events (often just a single frame) that will falsify the frequencies.
To eliminate those hidden 'errors' one mouse click is sufficient:
▪Click Transform - Time Values - Align ![]() to take care of any discrepancies.
to take care of any discrepancies.
All start time and offset times are correctly rounded to a multiplication of a frame duration based on the current FPS value of your data file.
| TIP: | If you temporarily switch to a time format that shows a millisecond value, you can see that the last 3 digits now show a repeating regular value. For example, at 25 fps, you see only these values as the last 3 digits: .040, .080, .120, .160, .200, .240, etc. |
If you have logged certain Markers (Events/Codes without duration - also single points in time), maybe during a live observation, you can extend all those Markers to a predefined length for further analysis.
Example: You have logged markers whenever a problem occurred during a live observation. During the detailed analysis of the video material you want to examine the time between the last 30 seconds before the problem occurred and the first 60 seconds after this problem occurred.
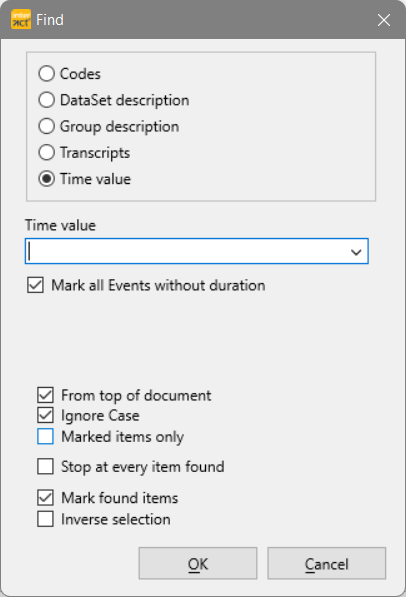
You can use the Search routine to select all Events without duration with a simple search: ▪Select ¤Timecode. ▪Select the option Mark all single point events.
▪Confirm your search with OK. |
 |
INTERACT can now extend all selected single point Events easily, using Transform - Time Values - Shift ![]() :
:
▪Enter -30:00 into the Start time text box, to move the start time of the the selected Marker(s) 30 seconds rearward in time.
▪Enter 60:00 into the End time text box, to move the offset of the the selected Marker(s) 60 seconds forward in time.
▪Confirm your settings to extend all selected Events to a duration of 90 seconds.