There are two ways to export the raw coding data:
oExport > all data - This command simply exports all Codes and Classes. It is possible to specify whether empty lines should be included or not.
oExport > Data filtered by Code. - This command only exports Events that hold at least one of the selected Codes. It will not export empty lines (because there is no Code available)
With these routines, it is possible to export the raw data in various ways:
oExport all DataGroups, DataSets and Events the way they are visible in the current INTERACT document.
oExport your data with an custom time format
oExport Events, including their duration per line
oExport Transcripts in a table-based structure
oExport Meta data per line
IMPORTANT: As soon as one or more rows have been marked in the document (some rows have a green dot at the front), the raw data export automatically exports ONLY the selected rows.
If NO rows are selected, all data for the selected Codes will be exported
Export all data
This routine directly shows the Export Details dialog.
▪Use this routine if empty lines need to be included in the exported file.
Data filtered by Code
You can either export all Codes, or just specific ones:
▪Click Start - Current Document - Export ![]() > Data filtered by Code.
> Data filtered by Code.
▪Select the Classes and Codes you want to export:
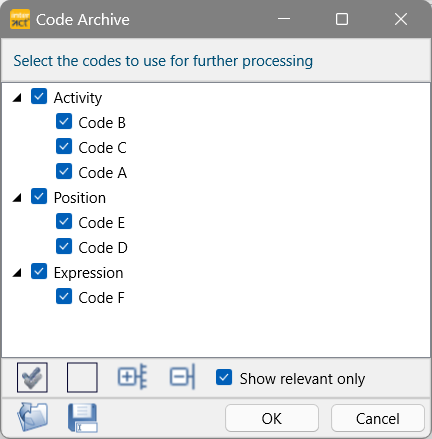
Note: The Codes selected in this dialog refer to the Events that hold these Codes. The Codes as such are only exported when in the next dialog, in its Columns to export section, the option Codes is selected.
After confirmation of your selection, the export settings dialog opens:
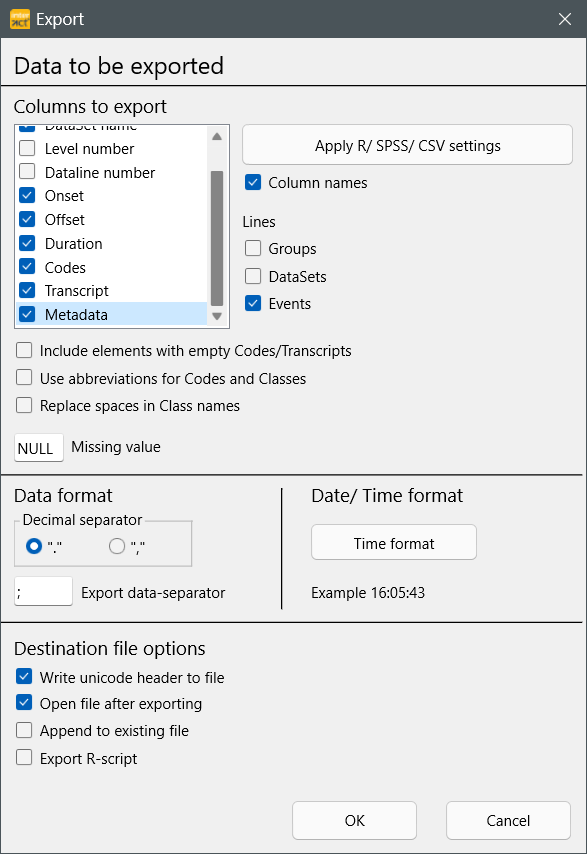
In this export dialog you can decide what exactly has to be exported:
Columns to Export
All available fields are listed here. Each selected field becomes a column in the output file:
oDataGroup name - Exports the information available in each DataGroup description line.
oDataSet name - Exports the information available in each DataSet description line.
oLevel number - To rebuild the original file structure, each DataGroup line is labeled 1, each DataSet line with 2 and each Event line is labeled with a 3, within the output file.
oData line number - Exports the line number for each line for the current data file.
ostart time - Start time values of each line.
oOffset - End time value of each line.
oDuration: Exports the duration for each line. Duration = Offset - start time + 1 frame.
(Because an Event of just one frame has, of course, a duration of 40 ms or 33,333 ms and not 0)
oCodes - Emits all Observation Codes from your data file, in separate columns per Class.
oTranscript - Export all text, entered in the Transcript field, for each line of the document.
oMetadata - Creates a column for each variable and enters the corresponding value for that Set into each Event line.
Specify Columns & Lines
You can limit and organize the exported data to your needs:
▪Select the columns you want to export, within the Columns to export list.
▪Drag & drop the column names into the right order, as required in your output file.
▪If you want to export your data without column headers, clear the option Column names.
Lines to Export
As a rule, the events should always be exported. If required, available hierarchy information can also be exported additionally as a row (as shown in INTERACT):
▪Select Events to export all Events holding one of the selected Observation Codes.
▪To export a list of Groups or to insert a DataGroup line above the Event lines, select DataGroups.
▪To export a list of Sets or insert a DataSet line above the Event lines, select DataSets.
Note: The DataGroup and DataSet lines in combination with the Event lines are usually NOT helpful when using the exported data in third-party applications.
Empty Lines & Empty Fields
If your data contains empty lines for the selected Classes, you can include or exclude those lines (that will only list their start time and offset information), depending on your needs:
▪To exclude all empty lines, clear the option Include elements with empty Codes/Transcripts.
(This is especially useful when exporting Transcripts only.)
Missing Values
You can replace all empty fields (Classes without a Code for that Event) with a predefined value during export:
▪Enter the value you need (e.g. "-", "0" or "EMPTY"), into the Missing value text box.
Replace Codes with an Alternative Description
If you make use of the abbreviations for displaying/translating alternative Codes in the statistic results and the Timeline Chart, you may also use those 'abbreviations' during export:
▪Select Use abbreviations for Codes and Classes to export the expressions entered into the Abbreviation column in your Code Archvie.
Exported Data Format
For processing your data in third-party software, the output format of your numbers as well as the column separator symbol are very important.
Per default, all columns are separated by the default list separator from your system. In Europe, this is usually a semi-colon (;), in the US a comma (,).
Those separators automatically result in a *.csv file.
▪Select the Decimal Separator required.
▪Enter the Data separator your software expects.
Most common separators are ; , and [TAB]
Note: CSV stands for 'Comma Separated Values'. That is why in the US csv files are separated with a comma (,). Because in Europe, the decimal separator is a comma (,) instead of a period (.), European csv files are separated with a semi-colon (;) !
The button Apply R/SPSS/CSV settings will set those values, among other things, according to your system defaults.
IMPORTANT: Do NOT use commas or semi-colons in your Class and Code names if you plan to export your data!
Select Time Format
You can choose between different formats for all exported time values:
▪Choose the Time format that fits your data best:
ohh:mm:ss:ff (Timecode) - International timecode, which provides frame accurate time information and equals the default Document Time Format.
ohh:mm:ss.xxx (Time.milliseconds) - Regular time notation including milliseconds.
ohh:mm:ss.xx (Time.centiseconds) - Regular time notation including hundredth of seconds.
ohh:mm:ss (Time short) - Standard time notation in which the frames are cut of. Most third party application can handle this time information. (e.g. Spreadsheet applications are capable of correctly calculating with time information in "hh:mm:ss" format).
oss.xxx (Seconds.milliseconds) - All time information is shown in second and milliseconds.
oss.xx (Seconds.centiseconds) - All time information is shown in second and hundredth of seconds.
offfffff (Video frames) - All time information is recalculated into frames. This value enables you to do frame accurate calculations in other applications. If you divide this value by the frames per second setting, used in the current document, you get the duration in seconds.
oxxxxxx (Milliseconds) - All time values are listed in milliseconds.
Long Term Observations
If the duration of your observations exceed the magical border of 24 hours, you can include the number of days into the notation of your statistical durations:
oDate format - If your observations exceed the 24 hours limit you can select how the days are displayed:
- None: Total duration is listed in the selected time format.
- # of days: The number of days is listed in combination with the remaining time in the selected time format.
- yyyy-mm-dd: Shows duration in years-months and days and the remaining time in the selected time format.
oShow date if zero - If not all durations exceed the 24 hours limit, this option assures that all durations are formated with day information.
oDay Symbol - Allows you to specify the character that is displayed behind the number of days.
oDate /Time separator - Enter a special character if you want, per default a SPACE is used.
| TIP: | Because the time format is set identically for all time columns (start time, offset and duration), you may want to add a separate 'Duration' column to your data, using the script described in Add Duration Column. |
Destination file options
These options allow you some further specifications concerning the output file for the exported data:
oWrite unicode header to file, writes an invisible header which is important for
oTo automatically open the exported result, select Open file after exporting.
A *.txt file is opened in Notepad, *.csv files are opened in Excel - if the separator setting matches your local settings.
oTo extend an existing export file with the exported data from your current data file, select Append to existing file.
The selected file is overwritten. The new version of that file contains the original data as well as the new data.
oThe option Export R-script additionally creates an R compatible script as explained in R script details.
Starting the export
After making your choice among all those options:
▪Click the Export button, to start the export procedure
▪Name the export file in the upcoming Save as... dialog and save it in a folder of your choice.
Restrict raw data export to marked lines
By default, the routines export all events or the ones that contain the Codes as selected in the "Code selection" dialog box at the start of the routine.
To export a specific selection independent of the codes entered (e.g. a set or a user-defined data selection):
•First select the required lines in the data file - manually or using the Search command .
Note: The moment a selection of lines exists inside the data file (green bullets in-front of one or more lines), only those selected Event lines will be exported.