If the first part of your video is irrelevant for your observation, you have two options:
| Edit video - Use a video editing tool to physically remove that first part. |
oPro: Every video starts just where it should.
oCon: Very time consuming because all video material must be rendered again, creating another copy of your video file.
| Add Offset - Virtually remove the part you are not interested in within INTERACT. |
oPro: Fast, because the original video is kept as it is.
oCon: All users must know that videos that are virtually edited must be opened by the reference in your data file.
How to edit your video in a third-party video editor is not part of this example. Even using our HighLight Movie Creator to edit you original video is not part of this example.
We'll focus on how to virtually remove the first part of the video, so your session starts at 00:00:00:00.
Note: The same technique can also be used to manually synchronize multiple recordings.
Specify Virtual Video Startpoint
This is how you can virtually shift the start point of your multimedia file, to any part of the video.
Example: The first 10 seconds and 13 frames of a video are irrelevant, maybe because it was recorded before your syncing activity, or only shows rubbish. Therefor we want to shift the start of the video (00:00:00:00) for 10 seconds and 13 frames, to virtually set that point in time as the new starting point of the video.
▪Open the multimedia file(s).
▪Click on the Settings ![]() icon within the Multimedia window.
icon within the Multimedia window.
The Multimedia Time Settings dialog opens:
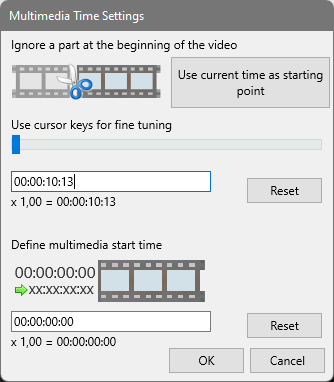
There are several ways of how to define the new video start point:
| Using the current position of the video - If you have already positioned your file at the correct point in time, using the video controls: |
▪Click the button Use time from control panel, to insert this point in time as the new video start point.
| Manually - If you know the exact time value of where the video should start, you can enter this time manually: |
▪Enter required the time value into the field right underneath the slider.
▪Press ENTER to ensure that INTERACT accepts the time and positions the video correctly.
You can use the slider to fine tune the time information, if the position is not 100% accurate.
| Using the slider - You can drag the slider to its approximate position. The video image matches the slider position. To position your video frame accurate: |
▪Click on the slider, to make sure it is selected.
▪Use the keys ARROW LEFT and ARROW RIGHT, on your keyboard, to make frame by frame adjustments.
All methods result in a new value within the first text box, right underneath the slider.
This time value is now regarded as the virtual start (point zero) of this video.
Therefor the time value in the timer display, now shows the value 00:00:00:00* whenever the selected position is reached.
As soon as you have successfully found the correct new start position - using either of the three methods:
▪Confirm with OK.
Store Offset-Information
For INTERACT to remember the specified offset information, a reference to the video file must be stored in your data file. This reference not only holds the name of the video, but also the specified time information of your video offset.
Insert Reference
For unnamed documents a dialog* reminding you to save the current document appears, after confirming any settings in the Multimedia Time Setting dialog.
Only for named documents, INTERACT can enter the optimal file reference to the video(s), based on the location of the current data file.
Note: Further details can be found in Link Multimedia for Observations and Open Linked and Synced Videos.
*) If your multimedia file(s) were already linked to your data, the time information is updated automatically
| TIP: | You can also use this routine if your video file contains multiple, separate sessions. |
The time information about the offset you specified is added at the end of the video file reference in milliseconds like this:
, OffsetMs: 10520.
This information is stored in the transcription area of the current DataSet.
Open Referenced Video Material
IMPORTANT: Once you have made any time-adjustments and linked your videos to a DataSet, make sure you DO NOT open those videos using the File - Open... command!
The file references include the required time information and if you open the manually, INTERACT does not know about any synchronization information.
ALWAYS double-click on a timecode within the Set to open the linked videos with the specified time information.
To use the information that is stored in the video reference(s), open the corresponding multimedia file(s) like this:
▪Start INTERACT
▪Open the INTERACT document (*.xiact) that contains the references.
▪Double-click on any of the time values listed.
INTERACT now automatically opens the corresponding multimedia file(s), based on the references in the data file and therefore 'knows' about any synchronization or time adjustments.
Note: If a file is not opened automatically, something in the path pointing to the file has changed (e.g. the drive letter appointed by Windows has changed).
Only this method activates any previously set time-adjustments.
| TIP: | Use relative file references whenever possible to rule out drive letter-based issues. |
▪For further details on all possible video time adjustments, read the various topics in the help chapter Adjust Time Values.