Note: The time value, shown in the Timer display in the Observation Ribbon, is used for logging Events!
Per default, INTERACT displays the time value provided by the multimedia file. Every digitized video starts at 00:00:00:00, which does not correspond with the actual recording time. For many studies this is just fine and even simplifies comparison of multiple sessions during analysis.
Sometimes, you need to change this value in order to match another time frame. The most important reasons to do this, are:
| Long term data with date - For long term studies, using real life time information including a date is important. With INTERACT you are able to define date and time as your video start time. You enter this information into the regular onset and offset fields, together with the time information. The syntax to be used is: YYYY-MM_DD HH:MM:SS:FF (or .xxx) e.g. 2014-06-30 16:06:25:00 |
| Create consecutive time Sequence over multiple videos - If your session recording was split into multiple video files, this function allows you to log all observations with chronological time information without the need to merge the videos into a single video file with the help of a video edition application. |
| Synchronization with VITC - If your video contains recorded time information that is visible while playing the video (formerly generated by a VITC generator or anything similar), you can "correct" the digitized video time information, as shown in the Observation Ribbon, to match the time information shown in your current video picture. |
| Synchronization with live data - If you want to display the day time of the initial recording you to need to synchronize a multimedia file with Codes from a real live coding session, containing day time information, you need to shift the video time (which always starts at 00:00:00:00) to the required day time. Also read Synchronize recordings with live data. |
There are probably more situations where this functionality comes in handy, but whatever the reason is:
IMPORTANT: You need to enter the appropriate information BEFORE your start logging behavioral Events based on that video!
Shift Time Value
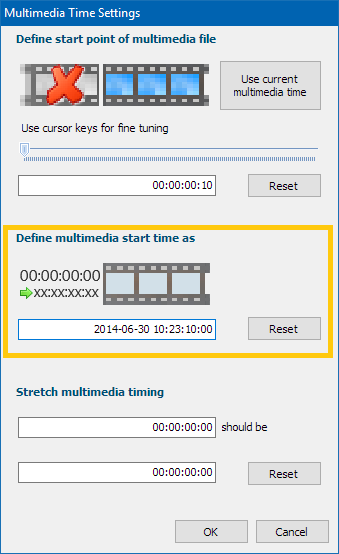
Presume you want the original start time (00:00:00:00) to look like 10:23:10:00, to match the real life recording time. Maybe even with the corresponding date, like this: 2014-06-30 10:23:10:00
▪Open the Multimedia settings dialog, of the current video file, by clicking the Settings ![]() icon at the bottom of a Multimedia Window.
icon at the bottom of a Multimedia Window.
▪Enter the value for the video start time into Define video start time as text box, as shown in the picture.
After confirming any settings in the Multimedia Setting dialog, another dialog appears*, asking you if you want to link the current video to the current DataSet.
▪To store the adjusted time information, confirm this question with Yes.
▪The answer to the second question depends on the location where you store your files and video.
▪Repeat this for each video.
Note: Further details can be found in Link Multimedia for Observations and Open Linked and Synced Videos.
*) If your multimedia file(s) were already linked to your data, the time information is updated automatically
INTERACT enters the following command, into the transcription field behind the video file and path information, like this:
TCShift: 2014-06-30 10:23:10:00
This means, that a time value of 00:00:00:00, for the start point of the video, is now shown as 10:23:10:00 in the Timer display. Each subsequent time value is automatically corrected as well, due to this setting (00:00:00:01 results in 2014-06-30 10:23:10:01 and so on).
Note: If you do use INTERACT during live coding sessions and need to synchronize live logged Events with the simultaneous recorded video, take a look at Synchronize Recordings with Live Data as well.
To change the actual Start Point of the video, use the slider.
▪For details read Synchronize Multiple Multimedia Files.
| TIP: | If you discover this functionality, after you started logging Events, nothing is lost, if you understand the math. You can make the adjustment afterwards and shift all already logged time values, using the Transform - Time Values - Shift |
IMPORTANT: Per default, INTERACT enables audio only for the 'leading' media file (the one with the ![]() symbol).
symbol).
The the moment you activate the audio of one of the other multimedia windows, the audio gets choppy.
This is caused by the way INTERACT handles the video-timing per default:
All multiple media files are played on a single time line, which allows you to start videos at different start times, showing a blank screen whenever the current playback time lays outside the time frame of that media file.
This 'single time-line' handling has an impact on the audio playback of all 'not leading' (no ![]() symbol in the media window)!
symbol in the media window)!
If you need to listen-in on multiple audio-tracks, you need to select the option Control Videos independently, within the Multimedia Program settings.
This provides good audio quality for all videos, but requires that all media files start at the same point in time.
•