The start time for every digitized multimedia file is 00:00:00:00.
If you want to analyze multiple files, that were recorded manually, you have to make sure that all files are synchronized BEFORE you start with the analysis.
IMPORTANT: Think of a special activity, movement, clapboard or flash light, before starting recordings using multiple sources.
oThe easiest way, off course, is to make sure all multimedia files are synchronized at their starting point 00:00:00:00.
oOur VideoSyncPro Studio was developed, to ensure that all videos are recorded in sync, right from the start. VideoSyncPro Studio is the heart of most Mangold Observation Labs.
oVideos recorded with independent cameras, never start exactly in sync, which makes manual synchronization afterward essential.
Afterward synchronization can be achieved in two different ways. For both methods, you need a specific event that is visible on all videos. Only than it can serve as a synchronization point or identified as your session start:
| Edit recorded Files - Use a video editing tool to remove any unwanted material, so the session starts at 00:00:00:00 for all videos. Video editing is rather time-consuming and most often requires re-encoding the original material. Depending on the original format this can be worth it, but it is very important to pick the best target-format, which again depends on your operating system. To be on the safe side, pick a format that can be used in mixed environments. |
▪Edit the original videos, so each of them starts with the actual start of the session.
| Synchronize in INTERACT - You can virtually edit your multimedia files from within INTERACT, by setting a new start point for each file. This virtually shifts the remaining time information and pretends the videos start at the same point in time. INTERACT does not alter the original multimedia material and does not require any re-encoding. It is important that you open videos with shifted time information ONLY through the linked reference! |
Synchronization Point
To adjust the start time of each multimedia file, you need an activity that can be easily recognized in each file.
Possible synchronization items would be:
oa movie clapboard
oa 'synchronization flash'
oa digital clock with milliseconds or 10th of seconds, that is visible by all cameras.
oA movement that is seen on all videos.
oFor less accurate synchronizations, even a sound or spoken word can do the job, but you do not hear the sound when positioning frame by frame.
If you did not knowingly record such an activity, you need to search for a usable movement or activity that is visible on all recordings and use that for syncing.
In this case, you need to manually calculate the difference between that specific event and the start of your session.
Adjust Starting Point
If you do have an exact synchronization activity, you need to locate this activity on each video manually. We presume this point marks the start of your session, that is why the start point of each video is set to this synchronization activity.
This is how you can virtually shift the start point of your multimedia file, to any part of the video.
Example: The first 10 seconds and 13 frames of a video are irrelevant, maybe because it was recorded before your syncing activity, or only shows rubbish. Therefor we want to shift the start of the video (00:00:00:00) for 10 seconds and 13 frames, to virtually set that point in time as the new starting point of the video.
▪Open the multimedia file(s).
▪Click on the Settings ![]() icon within the Multimedia window.
icon within the Multimedia window.
The Multimedia Time Settings dialog opens:
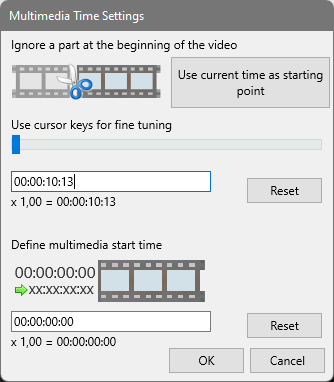
There are several ways of how to define the new video start point:
| Using the current position of the video - If you have already positioned your file at the correct point in time, using the video controls: |
▪Click the button Use time from control panel, to insert this point in time as the new video start point.
| Manually - If you know the exact time value of where the video should start, you can enter this time manually: |
▪Enter required the time value into the field right underneath the slider.
▪Press ENTER to ensure that INTERACT accepts the time and positions the video correctly.
You can use the slider to fine tune the time information, if the position is not 100% accurate.
| Using the slider - You can drag the slider to its approximate position. The video image matches the slider position. To position your video frame accurate: |
▪Click on the slider, to make sure it is selected.
▪Use the keys ARROW LEFT and ARROW RIGHT, on your keyboard, to make frame by frame adjustments.
All methods result in a new value within the first text box, right underneath the slider.
This time value is now regarded as the virtual start (point zero) of this video.
Therefor the time value in the timer display, now shows the value 00:00:00:00* whenever the selected position is reached.
As soon as you have successfully found the correct new start position - using either of the three methods:
▪Confirm with OK.
Store Offset-Information
For INTERACT to remember the specified offset information, a reference to the video file must be stored in your data file. This reference not only holds the name of the video, but also the specified time information of your video offset.
Insert Reference
For unnamed documents a dialog* reminding you to save the current document appears, after confirming any settings in the Multimedia Time Setting dialog.
Only for named documents, INTERACT can enter the optimal file reference to the video(s), based on the location of the current data file.
Note: Further details can be found in Link Multimedia for Observations and Open Linked and Synced Videos.
*) If your multimedia file(s) were already linked to your data, the time information is updated automatically
| TIP: | You can also use this routine if your video file contains multiple, separate sessions. |
▪Repeat those steps for every video you need to adjust.
Note: The time information (in the title bar of each media window) reflects the correction you just made; showing the original time as well as the new time value.
▪Use the INTERACT Multimedia Controls, to play your video(s) and pay attention to the time values in each video window.
▪Use the Go To Start ![]() button in the Multimedia Controls. You see that INTERACT handles your (re-)defined time code as the new point zero (00:00:00:00).
button in the Multimedia Controls. You see that INTERACT handles your (re-)defined time code as the new point zero (00:00:00:00).
| TIP: | If you want the time information to be displayed as a specific VITC value -available in the video- or if it needs to represent the day time value at which the recordings took place, read how to adjust the displayed time value in Adjust Multimedia Time Value |
Save adjusted Times
If your multimedia files are not linked correctly to your data file (e.g. because you accidentally declined the automatic reminder in earlier versions or moved your files) INTERACT will automatically enter a reference between your current document and the video file(s).
▪Details can be found in Link Multimedia for Observation.
Open linked Multimedia files
IMPORTANT: To open linked multimedia files, including any available time adjustments, NEVER use the File - Open method!
- Just double-click on any Event or time value within the corresponding DataSet.
▪Read Open Linked and Synced Multimedia Files for details.