The moment you have more than one camera and not enough hands to press the buttons simultaneously (or you require a higher precision for your synchronization), you need to follow a different approach. Again the technical setup decides what can be used.
Mangold VSP based Lab set-up
Our MangoldLab solutions offer an integrated recording procedure that saves you the trouble of syncing the videos manually:
| VideoSyncPro - VideoSyncPro is a unique video capture solution that captures and digitizes up to 9 video streams simultaneously, per recording station. Multiple stations can be linked if more cameras are required. This system synchronizes the start of all recordings and can send synchronization signals to other equipment. |
▪Contact us for further details. Write an email to sales@mangold-international.com or give us a call!
Log Live Events
If you have access to a VideoSyncPro Studio recording station, you can log live Marker directly with the recording software and import the resulting Marker file into INTERACT afterwards.
Other Lab Setup
If you have multiple, standalone cameras and no stationary recording station, use the slightly changed approaches described below to handle the synchronization.
Both methods require a specific synchronization activity. Possible synchronization activities are:
•Clapping a movie clapboard
•Using a clearly visible flashlight
•Performing a specific movement or gesture
•Watching a digital clock with ms or 10th of seconds
•etc.
all within clear view of ALL cameras of course!
| Insert a Synchronized Start Point - This method does not rely on the current time, because the start time is reset to 00:00:00:00. The following procedure allows you to create a new start point for all videos within INTERACT, independent of the moment the Record button on the camera was pushed. |
▪Press the Record button on all cameras.
▪Click ![]() , to get the ongoing day time value.
, to get the ongoing day time value.
▪Position the mouse on the Reset time ![]() icon in the Observation Controls.
icon in the Observation Controls.
▪Perform the synchronization activity and simultaneously click the Reset time icon.
▪Log your live Events as they appear.
▪Save your data file.
Because all data is logged starting from 00:00:00:00 and the videos where not started simultaneously, you need to adjust the start point of each video, afterwards. The new start point of each video needs to match the syncing activity. There are basically two ways of doing this:
•Physically edit each video with a video editor, removing all material that was recorded before the syncing activity.
•Virtually move the start point for each video with the help of INTERACT, virtually omitting all material that was recorded before the syncing activity.
Either way, the procedure can only start after the recordings are finished!
Edit Video
You can use any video editor, but you need to pay attention the output format. Editing the original video means that is usually gets converted as well, making the procedure time consuming, but it can also fix video codec issues.
If you have INTERACT Professional or Premium, which both includes the HighLight Movie Creator license, you can also edit your videos with that - as long as your source format is supported. This routine results in H264 compressed MP4 videos:
▪In INTERACT, click Start - Observation - Observation settings ![]()
▪Select Multimedia coding as your Observation source.
▪Confirm with OK.
▪Open a video to be edited in INTERACT.
▪Click ![]() to manually create an Event.
to manually create an Event.
▪Position the video at the start of your session and press CTRL+1, to set the start time of the Event.
▪Position the video at the End of your session and press CTRL+2, to set the offset of the Event.
▪To make sure that the video is linked correctly to a DataSet, click Insert - Multimedia link - To DataSet ![]() .
.
▪Click Additional - Edit Video - Create video based on selected Events ![]() , to start the editing process.
, to start the editing process.
▪Read VIDEO EDITING for further details
Shift Multimedia Start Point
This virtual method in INTERACT is less time consuming, but needs to be performed for each DataSet. It is also important that the time shift is stored in a link and that linked videos should no longer be opened through the File - Open menu:
▪Digitize your videos or copy the video files on a hard drive.
▪
▪In INTERACT, click Start - Observation - Observation settings ![]()
▪Select Multimedia coding as your Observation source.
▪Confirm with OK.
▪Open all videos within INTERACT.
▪Click the Media Settings ![]() icon of the first video, to open the Multimedia settings dialog.
icon of the first video, to open the Multimedia settings dialog.
▪Use the slider to position the video to the sync activity, in order to tell INTERACT this is the new start point of the video.
▪(Adjust the slider frame accurately by using the ARROW LEFT and ARROW RIGHT keys on the keyboard, until the correct frame is visible.)
▪Confirm with OK.
For unnamed documents a dialog* reminding you to save the current document appears, after confirming any settings in the Multimedia Time Setting dialog.
Only for named documents, INTERACT can enter the optimal file reference to the video(s), based on the location of the current data file.
Note: Further details can be found in Link Multimedia for Observations and Open Linked and Synced Videos.
*) If your multimedia file(s) were already linked to your data, the time information is updated automatically
▪Save your data file!
▪Double-click the 'start' Event, to position the videos and press Play to watch it from there.
| Log a special Sync-Event - This manual method logs the current day time, during your live observation. It also requires a synchronized start point as described above. Additionally you need to adjust the displayed video time information. |
▪Open the Code definition window and clear the SPACEBAR is treated as a Code with duration check box at the bottom of this dialog.
▪Press the Record button on all cameras.
▪Click ![]() to get the current day time as an ongoing time value.
to get the current day time as an ongoing time value.
▪Perform the synchronization activity and simultaneously press the SPACEBAR, to log a Event to correspond with this syncing activity.
▪Log your live Events as they appear.
▪Save your data file.
The resulting document won't match the videos at all, so you need to make the following adjustments to the video settings.
Sync Video Start Point and Adjust Video Time value
▪Digitize your videos or copy the video files on a hard drive (convert them if need be)
▪In INTERACT, click Start - Observation - Observation settings ![]()
▪Select Multimedia coding as your Observation source.
▪Confirm with OK.
This is how you can virtually shift the start point of your multimedia file, to any part of the video.
Example: The first 10 seconds and 13 frames of a video are irrelevant, maybe because it was recorded before your syncing activity, or only shows rubbish. Therefor we want to shift the start of the video (00:00:00:00) for 10 seconds and 13 frames, to virtually set that point in time as the new starting point of the video.
▪Open the multimedia file(s).
▪Click on the Settings ![]() icon within the Multimedia window.
icon within the Multimedia window.
The Multimedia Time Settings dialog opens:
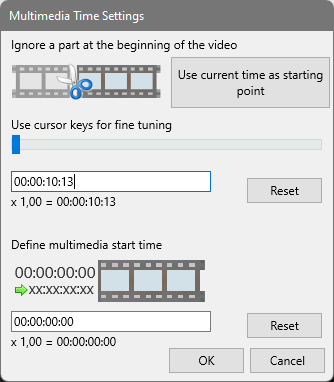
There are several ways of how to define the new video start point:
| Using the current position of the video - If you have already positioned your file at the correct point in time, using the video controls: |
▪Click the button Use time from control panel, to insert this point in time as the new video start point.
| Manually - If you know the exact time value of where the video should start, you can enter this time manually: |
▪Enter required the time value into the field right underneath the slider.
▪Press ENTER to ensure that INTERACT accepts the time and positions the video correctly.
You can use the slider to fine tune the time information, if the position is not 100% accurate.
| Using the slider - You can drag the slider to its approximate position. The video image matches the slider position. To position your video frame accurate: |
▪Click on the slider, to make sure it is selected.
▪Use the keys ARROW LEFT and ARROW RIGHT, on your keyboard, to make frame by frame adjustments.
All methods result in a new value within the first text box, right underneath the slider.
This time value is now regarded as the virtual start (point zero) of this video.
Therefor the time value in the timer display, now shows the value 00:00:00:00* whenever the selected position is reached.
As soon as you have successfully found the correct new start position - using either of the three methods:
▪Confirm with OK.
Store Offset-Information
For INTERACT to remember the specified offset information, a reference to the video file must be stored in your data file. This reference not only holds the name of the video, but also the specified time information of your video offset.
Insert Reference
For unnamed documents a dialog* reminding you to save the current document appears, after confirming any settings in the Multimedia Time Setting dialog.
Only for named documents, INTERACT can enter the optimal file reference to the video(s), based on the location of the current data file.
Note: Further details can be found in Link Multimedia for Observations and Open Linked and Synced Videos.
*) If your multimedia file(s) were already linked to your data, the time information is updated automatically
| TIP: | You can also use this routine if your video file contains multiple, separate sessions. |
▪Save your data file.
▪Close all videos to reset the time counter properly.
▪Double-click the start Event, to open and position the videos correctly.
▪Press ![]() to watch the videos.
to watch the videos.