The methods described here may also work for 2 cameras, if you have some help at starting the recording on both cameras and the required accuracy is not that high.
| Reset the live-observation time - This manual method is based on resetting the live ongoing time value to 00:00:00:00, the moment you start the recording. This way, the timing matches the default 00:00:00:00 value of the recorded video file afterwards. This is the easiest way to sync your live coding with the video, but it only works in a setup in which you can reach both the camera and the PC at the same time: |
▪Click ![]() .
.
This gets the timer going, showing the current day time.
▪Position the mouse on the Reset time ![]() icon.
icon.
▪Press the Record button on your camera and simultaneously click the Reset time icon.
The timer now shows time values starting from 00:00:00:00. Those time values are used while logging Events and this ensures that the resulting document automatically fits the recorded video. No further adjustments needed.
▪Log your live Events, whenever they occur.
▪Save your data file.
For further analysis, you need to transfer and link your video to your INTERACT data file:
▪Digitize your video or copy it on a hard drive (convert them if need be).
▪In INTERACT, click Start - Observation - Observation settings ![]()
▪Select Multimedia coding as your Observation source.
▪Confirm with OK.
▪Click Insert - Multimedia link - To DataSet ![]() to link the video to your live data.
to link the video to your live data.
▪Check your live codings.
▪Start coding with whatever detailed Events and Codes you'd like to add..
| Log System Time Events - This manual method is based on creating an Event the very same time the recording starts. The current, ongoing time value of your computer is used as a time reference. Simply use the SPACEBAR to create an Event with just the time reference of the start of the recording (or you create a special "Start" Code with no duration within your code definitions). |
▪Open the Code definition window and clear the SPACEBAR is treated as a Code with duration check box at the bottom of this dialog.
▪Click ![]() .
.
The Timer shows the current day time as an ongoing time value. You now need to log a 'Start' Event using the current daytime, the very moment the video recording starts:
▪Simultaneously press the Record button on your camera and the SPACEBAR on your keyboard (or press the [key] of your "Start" code).
An Event with the current day time is logged. This time value is used to adjust the start time value of the video later on.
▪Log your live Events, whenever they occur.
▪Close the current session by clicking ![]() .
.
▪Save your data file.
The resulting document requires an adjustment of the video time value, in order to synchronize it with the Events logged with day time information.
Sync Video Time to Day Time Value
Warning: Make sure you make this adjustment BEFORE you start logging video based observations!
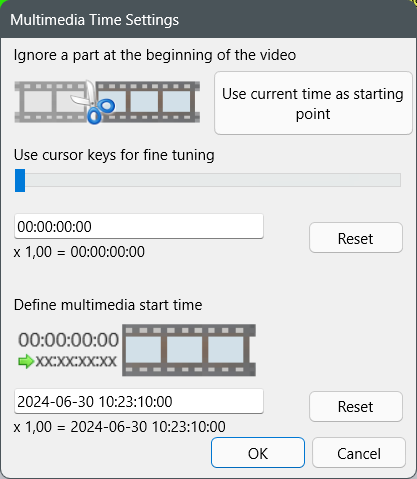
▪Open the Multimedia settings dialog, of the current video file, by clicking the Settings ![]() icon at the bottom of a Multimedia Window.
icon at the bottom of a Multimedia Window.
▪Enter the value for the video start time into Define multimedia start time text box, as shown in the picture.
For unnamed documents a dialog* reminding you to save the current document appears, after confirming any settings in the Multimedia Time Setting dialog.
Only for named documents, INTERACT can enter the optimal file reference to the video(s), based on the location of the current data file.
Note: Further details can be found in Link Multimedia for Observations and Open Linked and Synced Videos.
*) If your multimedia file(s) were already linked to your data, the time information is updated automatically
INTERACT enters the following command, into the transcription field behind the video file and path information, like this:
TCShift: 10:23:10:00
or, if you also entered a date:
TCShift: 2024-06-30 10:23:10:00
This means, that a time value of 00:00:00:00, for the start point of the video, is now shown as 10:23:10:00 in the Timer display. Each subsequent time value is automatically corrected as well, due to this setting (00:00:00:01 results in 10:23:10:01 or 2024-06-30 10:23:10:01 and so on).
Note: Adding a date is good for calculating duration across days, but can be problematic when comparing events per day. If both is required, add a date so calculations across days is possible and use the virtual Shift to zero command to compare Events per day.
▪Save your data file.
IMPORTANT: Once you have made any time-adjustments and linked your videos to a DataSet, make sure you DO NOT open those videos using the File - Open... command!
The file references include the required time information and if you open the manually, INTERACT does not know about any synchronization information.
ALWAYS double-click on a timecode within the Set to open the linked videos with the specified time information.
To use the information that is stored in the video reference(s), open the corresponding multimedia file(s) like this:
▪Start INTERACT
▪Open the INTERACT document (*.xiact) that contains the references.
▪Double-click on any of the time values listed.
INTERACT now automatically opens the corresponding multimedia file(s), based on the references in the data file and therefore 'knows' about any synchronization or time adjustments.
Note: If a file is not opened automatically, something in the path pointing to the file has changed (e.g. the drive letter appointed by Windows has changed).
Only this method activates any previously set time-adjustments.
| TIP: | Use relative file references whenever possible to rule out drive letter-based issues. |
Opening observational sources using the file references is important for linked multimedia files in general, but especially for:
oMultiple, synchronized multimedia files, as described in Synchronize Multiple Multimedia Files
oMultimedia files with an adjusted start point, as described in Set new Multimedia Start Point
oMultimedia files with adjusted time values, as is described in Adjust Multimedia Time value
For any of those situations, it is vital that you Link your Multimedia file(s) to your data, in order to store the settings for any of those adjustments.
| TIP: | If you notice that all live coded Events are a bit off, due to the fact that the camera did not start recording right after pushing the Record button, there are several ways to correct that, using one of the routines described in Change Multiple Time Values or the section Video Time Code adjustments. Do this BEFORE starting any detailed video based codings! |