To include a gaze trail in you screen recording (so you can not only see the position of the mouse cursor, but also the position of the user gaze) you need at least one compatible Eye Tracker device.
BEWARE: LoqSquare is NOT able to analyze the gaze data, it just records the current gaze position as additional information in your screen-cast.
This gaze position is drawn into the screen video during the session, which requires a lot of CPU/GPW power. Make sure your system has a good NVIDIA Graphics board to handle the extra work load and verify your recording in the LogSquare Analyzer to see if your system can handle the work load*!
Note: If your system cannot handle the workload, frames will be dropped during the recording. This results in way too fast running screen and user video recordings during playback
| TIP: | To reduce the workload, you can reduce the number of frames per second for your recording in Recording settings. |
*) Verify if the length of your screen video matches that of the corresponding user video and check the video time with the Event times in your Event list. Additionally, verify if especially the recorded computer audio sounds OK.
To visualize gaze data, you need to:
▪Connect one or more compatible Eye Tracker(s) to the participant computer.
(In case of a Multi-monitor participant-PC, one Eye Tracker for each monitor to be recorded.)
▪Make sure the Eye Tracker is positioned correctly, as described in Hardware Quick Start.
▪Select Start - Recording Options - Record User Eyes to activate the recording of gaze points.
▪Verify if the gaze data specific recording options are set correctly in the EyeTracking Settings.
Note: If you do not have a Mangold Eye Tracker, contact our support team to verify if your system is compatible.
Calibration
IMPORTANT: To get reliable results, you need to calibrate the Eye-Tracker hardware for each participant and monitor/Eye-Tracker combination separately!
Various environmental factors influence the quality of the calibration:
o(Changing) light conditions
oDry eyes
oAdjustments to the chair (Height, Distance)
oAngle between monitor and Eye-Tracker
Multi-Monitor Setup
IMPORTANT: If you have multiple monitors, but only one eyetracking device, LogSquare will tell you to what monitor the device needs to be connected.
LogSquare supports multiple Eye trackers! This allows you to track gazes on multiple monitors.
The setup for multi eye tracking in LogSquare is very easy:
▪Attach as many eye trackers to the pc as you like.
▪Make sure that the eye trackers have a horizontal gap of about 15 cm between them.
▪Start the LogSquare Recorder and set a file name for 'Save Recording as'
▪Select Start - Recording Options - Record User Eyes to activate the collection of gaze data.
▪Switch to the Recording Area tab and select Full Desktop.
With this option, the LogSquare Recorder will record a screen video of the whole extended Windows desktop.
▪Switch back to Start and click on ![]() , to start the recording
, to start the recording
At the bottom of the black start screen on each monitor, the LogSquare Recorder tells you which eye tracker has to be attached to which screen:
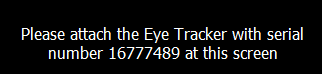
▪Position the eye trackers accordingly and make sure the serial number matches that on the screen.
▪Press any key on the keyboard to continue.
The calibration process is repeated for each eye tracker, starting with the first screen.
Note: Make sure you position yourself during the calibration similar to the way you are positioned during the test itself; if the activities on the different monitors requires moving the participants chair, make sure this is also done during calibration or vise versa.
After the last calibration is done, the screen recording starts.
Eye Tracking Settings
Depending on the status of the Display live eye tracker image option in the application settings, the following happens:
| Disabled 'Display live eye tacker image' option - The screen stays completely black at first. The moment a participant positions itself in front of the camera two dots - representing the eyes - appear on the screen; one red and one green. |
Enabled 'Display live eye tacker image' option - The scene camera shows the user face and surroundings. The moment the eyes are 'found' by the Eye-Tracker, a green and a red cross appear in the eyes, like this: |
| TIP: | Press the SPACEBAR during the preview, to toggle between both views. |
In both cases:
▪Make sure both eyes are recognized, indicated by a green X for the left eye and a red X for the right eye.
IMPORTANT: If you still use the TM3 Eye-Tacker model, you need to manually adjust the focus of the camera. All newer model have auto-focus.
Start Calibration
When both eyes are recognized correctly:
▪Click the  button to start the calibration.
Calibration points
Depending on the type and number of calibration targets, selected in the Calibration settings dialog and defined in the calibration stimulus, a number of calibration targets now appear successively on the screen.
In case of the default calibration targets, it works like this:
Starting in the upper left corner a small red circle appears.
▪Focus on this point until the target turns green.

All calibration points (as defined in the Calibration stimulus) appear spread over the monitor one by one.
▪Look at each calibration point until your eyes are focused and the circle turns green.
Per default, the actual test is started after the calibration was successful.
If the calibration did not match the predefined threshold, a dialog showing you the quality of the calibration appears:

The left value represents the calibration value of the left eye, the right value that of the right eye. The higher the marker raises, the better is your calibration. This dialog offers you the following options:
èContinue
▪Click Continue if you approve of the current calibration results.
The test immediately proceeds.
èImprove
▪Click Improve to improve your calibration.
In this case, the 'Results' dialog disappears and the 'eyes' re-appear.
▪Click the button to re-calibrate the point that was calibrated most poorly.
Only one circle appears, to be calibrated.
▪Focus on this point until it turns green.
The calibration Results dialog re-appears.
▪Continue until you are satisfied and proceed with your presentation.
èRe-calibrate
▪Click Recalibrate to start the calibration from scratch.
èAbort test run
▪To cancel the whole test, click the Abort button at the bottom of the dialog.
Tips to improve (calibration) results
The quality of calibration might vary between participants. To get the best results possible, take the following issues into account:
oAvoid all unnecessary reflections like produced by e.g. ceiling lights, because they create distracting spots on the eyes.
oMake sure the eyes of the participants are not too dry; encourage the participant to blink between calibration points. Use eye drops in case of extremely dry eyes.
oPrefer glasses with non-reflecting glass; avoid reflections on glasses by reducing the surrounding lights.
oMake sure the test person is positioned in a comfortable position that can easily be kept during the test.
oIdeal positioning of the participant puts the top of the user’s head roughly as high as the top of the display area.
oThe distance from camera to user’s eye should be approximately 50 – 70 cm.
oUse a 16 point calibration for most accurate results.
IMPORTANT: Make sure the participants position during calibration reflects the position during the test!
E.g. if the participant is supposed to perform a test using mouse and/or keyboard, its position will differ from a participant just watching.