If you want to allow the participant to work through the tasks without external interference and at its own speed, just allow the participant to switch tasks themselves. That way they are able to work through all the tasks on their own.
During the recording session, this functionality is handled by the floating Scenario Panel that can be freely positioned on the screen. The Panel does occupy space on the monitor itself, and thus is recorded. If you want a full view of a full page application in combination with self managed tasks - with no room to position both windows along side - it is advisable to work with two monitors:
The main monitor to record your session and a second monitor to display your tasks (and codes).
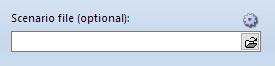
Assign Scenario File
Independent of who is using this functionality: The required *.LogSquareScenario file needs to be selected on the participant PC!
▪Start the LogSquare Recorder on the participant PC.
▪Click on the little folder icon at the far right of the Scenario file field, to select the *.LogSquareScenario file of your choice.
Setup Local Task Management
To make sure the required elements are available in the Scenario Panel during the test:
▪Click on the little settings icon ![]() located at the Scenario File selection field to open the Scenario settings dialog.
located at the Scenario File selection field to open the Scenario settings dialog.

▪Make sure the option Allow user to switch Tasks is activated.
▪Set the option Allow user to enter codes, according to your needs.
▪Set the option Allow user to enter comments, according to your needs.
▪Confirm your settings with OK.
Use Participant Controlled Task Management
If you did not setup a viewing room or if there are too many participants to monitor simultaneously, it is best if you specify all your tasks and surveys as Auto-Start tasks, to ensure each task is started properly!
Once you have assigned a Scenario File on the LogSquare Recorder station and selected the required settings, as explained in the topic Task Management, the participant has access to the scenario panel.
What happens the moment a recording is started, depends on how you specified your tasks in the scenario file:
| Auto-Start Tasks - If you selected the Auto Start Task option for all your tasks, there is no noticeable difference to the Moderator controlled Task management: |
The moment you start a recording session the dialog with the Task description appears:

▪Carefully read your task description, so you know what to do.
▪Confirm with OK to start with the task.
The moment this dialog is confirmed, LogSquare logs that point in time as the start time of that task.
| Manuel Task Starts - If you did NOT select the Auto Start Task option for a task, the floating Scenario Panel appears, showing the description of the first task: |

▪Click on the Start Task button to continue.
IMPORTANT: If the participant does NOT click the Start Task button, the task is never officially started!
The task description dialog as shown above appears.
▪Confirm with OK to start with the task.
Switch Tasks
Once our task has started, the upper part of the floating Scenario Panel changes into something like this:

The moment the participant has finished a task, it should be closed properly:
▪Click the button Task Succeeded, Task Failed or Task Aborted that applies to your situation the moment you are through with the current task and to get to the next task.
Note: LogSquare will log this point in time as the end-time of this first task.
oIf you have not disabled the Allow user to enter codes option, the LogSquare Coder panel automatically shows the currently available Participant Codes as well.
oIf activated, you can use the Chat area at the bottom of this panel to communicate with the moderator.
End Recording
If you cleared the optionStop recording after last task in the Scenario Settings, you'll need to manually stop the recording when finished
▪Press PAUSE on your keyboard or choose Stop recording from the tray icon context menu at the end of the recording session.
| TIP: | To minimize the size of the scenario panel during a session, click on the little icon in the upper right corner of the Scenario Panel. Only the floating title bar will remain. |