INTERACT offers various export options and routines from within the Timeline Chart. You can influence them with the settings available in the Export tab of the Program Settings.
▪Click General - Program - Settings ![]() .
.
▪Switch to the Behavior - Clustered data Export tab.
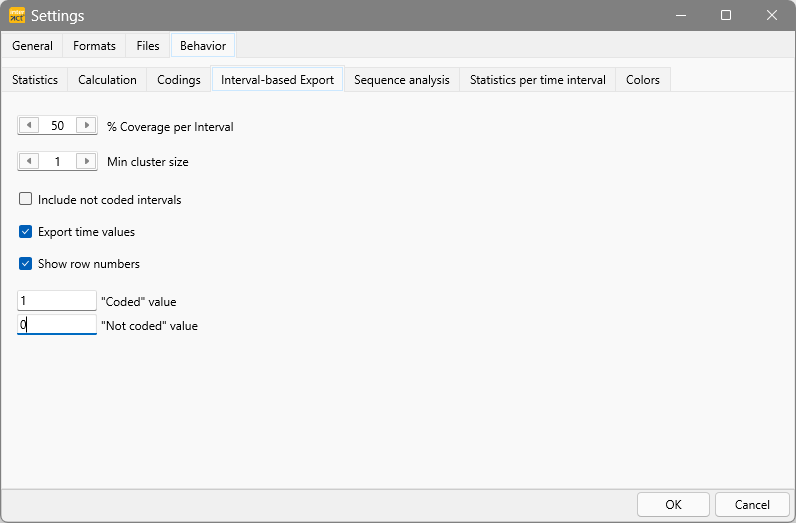
Interval Coverage
For all interval-based export routines, your data is basically cut into 'time slices'. You set the thickness of these 'slices' with the interval value on the Grid tab. Each interval is represented by a single line in the output file.
Since Event-based data does not necessarily cover every interval completely, you can determine when a code for a specific interval should be counted as coded or not.
Per default, a Code is only considered 'present' if it covers at least 50% of the duration of the interval length (= one slice).
To export every occurrence of a Code the moment it is detected within a interval, you need to adjust this percentage. Same thing, if you only want to count Codes that cover an interval completely.
In this example, the Event lasts for 00:00:03:11, at 25 fps this means it has a duration of 3,48 seconds:
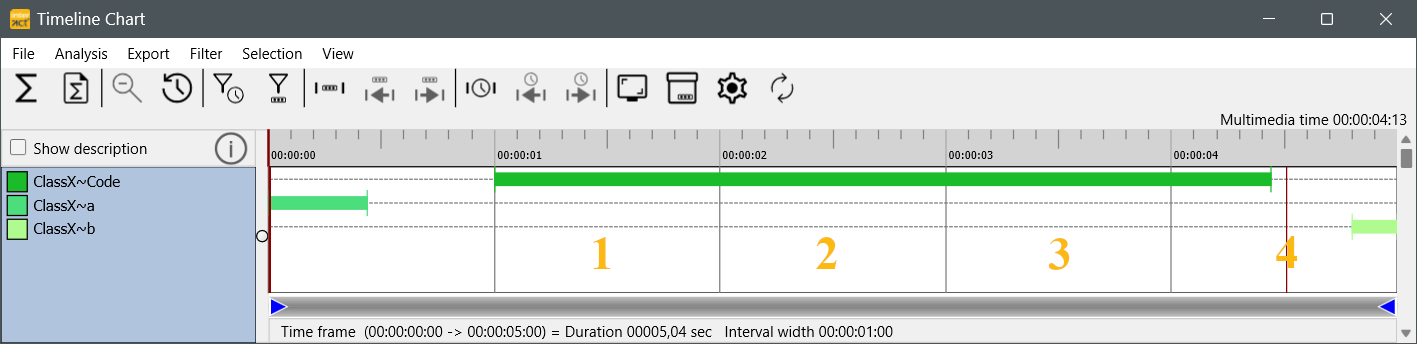
For onw-second intervals, the 4th interval is covered for less than 50% thus this part of the Event is not counted for this interval. To count the Codes as coded for that interval, you need to adjust the % coverage accordingly (e.g. reduce it to 40%).
▪Change the percentage within the % Coverage per Interval field, to adjust the outcome of the export routine.
Cluster size
The value for minimal cluster size is only relevant for the Cluster data export routine.
Intervals included
Include not coded intervals - This option adds empty lines in case the selected data does not start from 00:00:00:00 or has gaps in-between.
Export Time values
The second part enables you to include time code information in the Export data per code and Export data per Class routines:
▪Select Export time values, if you want to export the time information for each interval.
Specify the time format on the Formats - Statistics Format tab:
▪Choose the Time format that fits your data best:
ohh:mm:ss:ff (Timecode) - International timecode, which provides frame accurate time information and equals the default Document Time Format.
ohh:mm:ss.xxx (Time.milliseconds) - Regular time notation including milliseconds.
ohh:mm:ss.xx (Time.centiseconds) - Regular time notation including hundredth of seconds.
ohh:mm:ss (Time short) - Standard time notation in which the frames are cut of. Most third party application can handle this time information. (e.g. Spreadsheet applications are capable of correctly calculating with time information in "hh:mm:ss" format).
oss.xxx (Seconds.milliseconds) - All time information is shown in second and milliseconds.
oss.xx (Seconds.centiseconds) - All time information is shown in second and hundredth of seconds.
offfffff (Video frames) - All time information is recalculated into frames. This value enables you to do frame accurate calculations in other applications. If you divide this value by the frames per second setting, used in the current document, you get the duration in seconds.
oxxxxxx (Milliseconds) - All time values are listed in milliseconds.
Long Term Observations
If the duration of your observations exceed the magical border of 24 hours, you can include the number of days into the notation of your statistical durations:
oDate format - If your observations exceed the 24 hours limit you can select how the days are displayed:
- None: Total duration is listed in the selected time format.
- # of days: The number of days is listed in combination with the remaining time in the selected time format.
- yyyy-mm-dd: Shows duration in years-months and days and the remaining time in the selected time format.
oShow date if zero - If not all durations exceed the 24 hours limit, this option assures that all durations are formated with day information.
oDay Symbol - Allows you to specify the character that is displayed behind the number of days.
oDate /Time separator - Enter a special character if you want, per default a SPACE is used.
Row Numbers
Show row numbers - This option inserts a plain row number in front of each interval line.
Export Values
The lower part defines the exported values replacement values, used in the Export data per Code routine (e.g. "0", "99", " ", "NIL", "NULL", "X", etc.). :
•"Coded" value - The value that is used, for each time a Code is 'coded' within the specified interval.
•"Not coded" value - The value that is used, for each time a Code is 'not coded' within the specified interval.
Note: For the Export of data per Class only the value for 'not coded' is of interest, because for all coded values the original values are exported.
Clustered data export
The third part influences the results of the Cluster data export:
▪Select Include not coded intervals, if that is what you want.
▪Enter the Min. cluster size.
Note: The value selected as the minimal cluster size, is used as a multiplier for the Interval size as set on the Grid tab. This means, that with an interval of 5 seconds and a cluster size value of 2, the cluster size is in fact 10 seconds!
▪To export all empty intervals as well, select Include not coded intervals as well.